
A claim generation setup turns a class of transactions into claims on a schedule, entirely through configuration — no code per claim type. This page walks through authoring one safely. The concepts behind each element are covered in Trade claims; the entity-level field reference is under Claim Generation Setup and Claim Settlement Setup.
Setups live in the Claims app under Claim Generation Setups (/ClaimGenerationSetup). A setup record has two tabs: Details, where every pipeline field sits in five collapsible sections, and Rules, which holds the child Claim Generation Setup Rule rows. You need create and edit permission on both entities (both belong to the Claims product licence), and access to Setup → Administration → Jobs to read run results, because generation always runs as a background job.
Saving a setup that names a Source Entity compiles and executes the main source query with a one-row limit, so a bad field path or filter expression fails at save time. The netting query gets the same probe only when both Netting Source Entity and Netting Filter Expression are present. This is a structural check, not a financial reconciliation of the whole population. A setup with a custom Target Entity and no Processed Flag Field is refused outright.
A newly created setup defaults to Active off and Simulate Mode on. A setup copied from another can carry any persisted values, including active and non-simulated, so inspect the exact row instead of assuming a state from its name.
Procedure
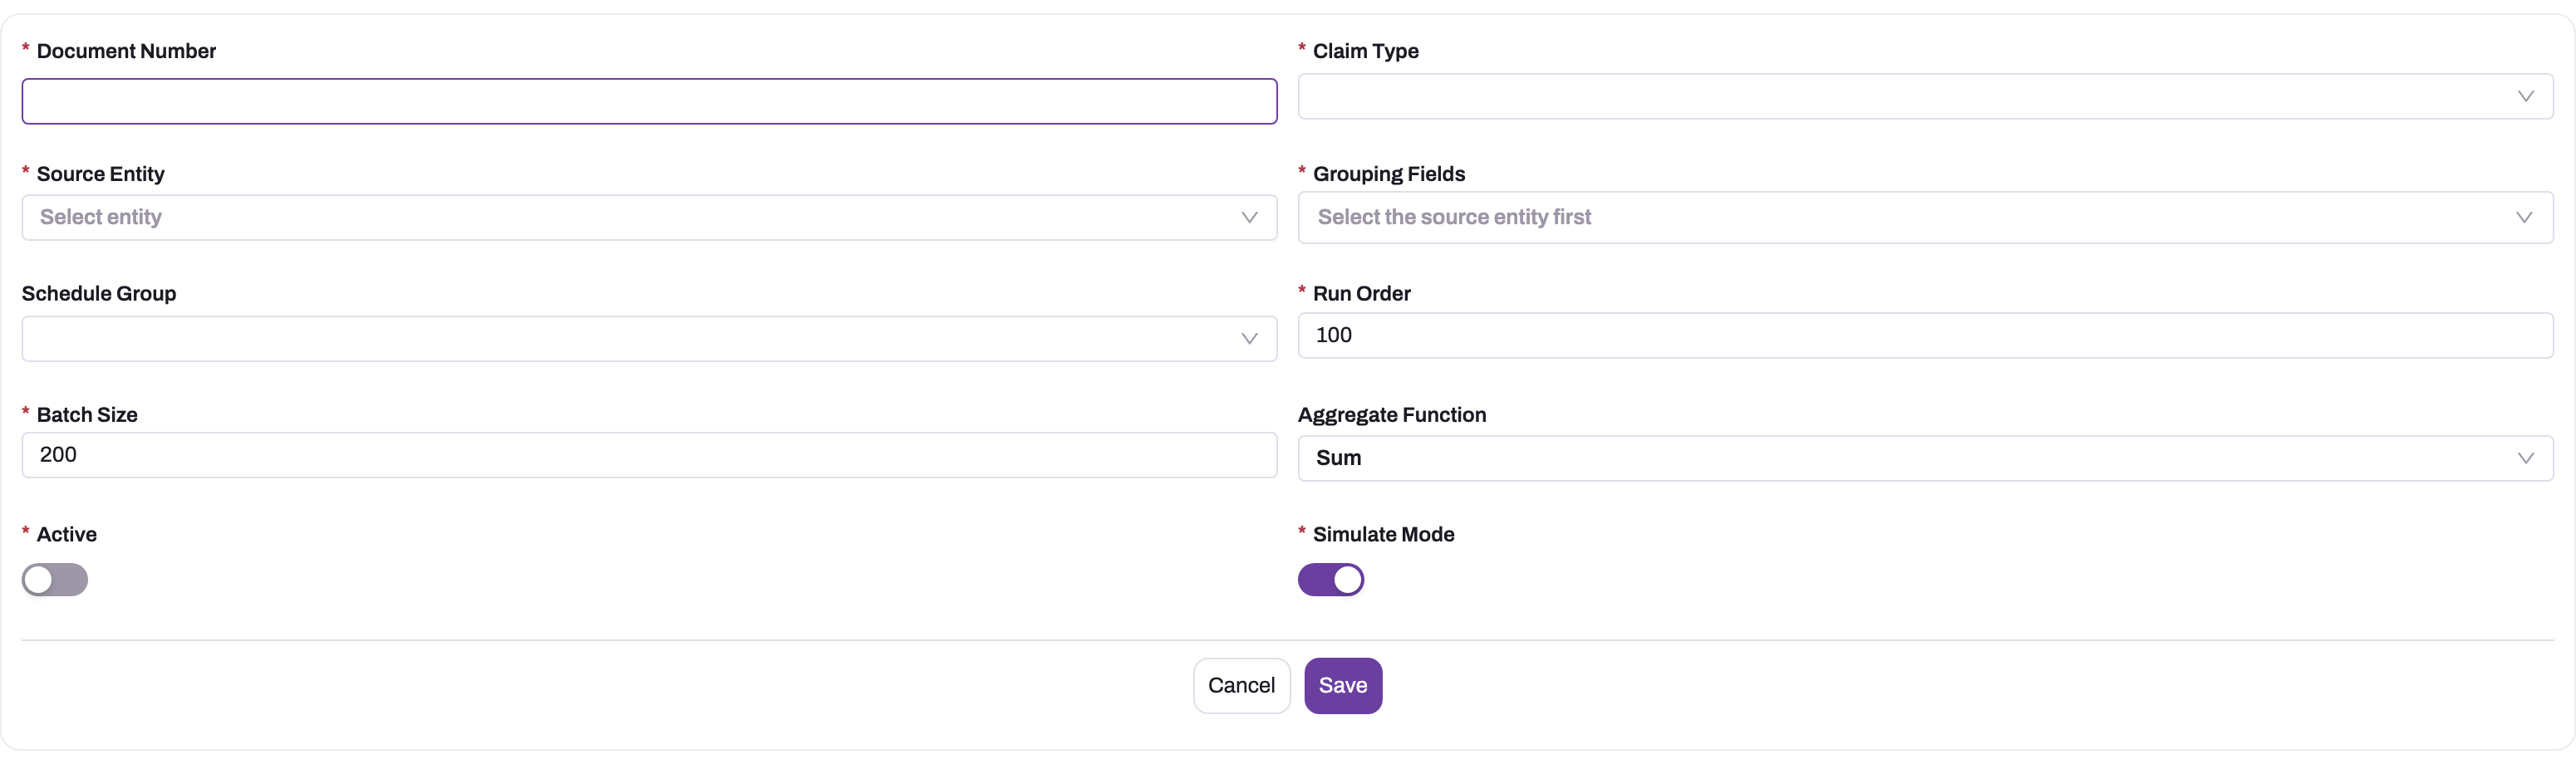
- 1
Document Number names the setup; Claim Type (right) is the coded type stamped on every generated claim and must match an active settlement setup.
- 2
Source Entity is the entity swept for candidates. Pick it first: the Grouping Fields list is built from its fields.
- 3
Grouping Fields form the group key (one claim per distinct combination); a run with no grouping fields fails on its first source row.
- 4
Schedule Group (Nightly, Weekly, Monthly (Day 1)) and Run Order decide when and in what sequence the setup runs; leave the group blank for a manual-only setup.
- 5
Batch Size (source rows per page, clamped to 1-5000) and Aggregate Function (Sum or Per Record) control run volume and how source values become claim lines.
- 6
Keep Simulate Mode on and Active off until a complete simulated cycle reconciles to an independent calculation.
The create form asks only for the identity, source, grouping and scheduling fields; everything else is completed on the Details and Rules tabs after the first save. Keep Active off and Simulate Mode on until a full simulated cycle reconciles independently.
Step 1 — Create the setup and name its source
Choose New on the Claim Generation Setups list. Give the setup a Document Number (its name), a Claim Type and the Source Entity whose records earn the claim — scheme ledger accruals, invoice lines, credit-note lines, goods-receipt lines, purchase-order lines or any entity including custom ones. Choose the source before Grouping Fields, because that list is built from the source entity's fields.
The claim type is normally fixed from the setup. Claim Type Source set to SourceField:<path> (on Details after the first save) reads it per source row instead, falling back to the setup's Claim Type when the path is empty; if both resolve to nothing the run fails. The setup's Claim Type picklist is the generation engine's coded vocabulary and must equal the Claim Type of the settlement setup that will settle the claims.
Assign a Schedule Group with a Run Order (default 100). The shipped groups are Nightly, Weekly and Monthly (Day 1); organizations can add their own picklist values. A setup with no schedule group can still be run manually but never runs on a schedule. Batch Size (default 200, clamped to 1–5000 at run time) is the number of source rows read per page; it affects memory and progress reporting, not the result. Save.
Step 2 — Define selection
Open the Details tab, section Source & Selection, and the Rules tab. Restrict the source three ways, all optional but usually combined:
- Rule rows on the Rules tab — Sequence, Field Name, Operation and Field Value. Operations are Equals, Not Equal, Greater Than, Less Than, Contains, In and Not In (the grid shows the stored operator code). Rule Success Criteria combines the rows with AND (default) or OR; Rule Custom Logic such as
(1 AND 2) OR NOT 3overrides the criteria and references sequence numbers. A formula that names a sequence with no rule row, or contains an unknown word, fails the run rather than being ignored; a rule row with a blank Field Name is silently dropped, which is the usual way a formula ends up pointing at a missing sequence. - Filter Expression — a dynamic-LINQ predicate for conditions rules cannot express, for example
Quantity > 0. It is ANDed with the rule rows, never a replacement for them. - Date Window (
None,Last Month,This Month,Last N Dayswith Date Window Days) applied to Date Field, which may be a navigation path such as a line's parent document date. Windows are resolved from the UTC date;Last N Daysruns from N days ago up to and including today.Nonedisables date filtering whatever the field says, and a window with a blank Date Field is silently inert.
Name the Processed Flag Field (section Mappings & Output) when the source has a suitable Boolean field. The query then excludes flagged rows, and a successful claim write flags its contributors in the same transaction. For a normal Claim target this flag is optional because Claim also has a generation-key guard; without it the source is read again on every run even though an identical key is skipped. For a custom Target Entity the flag is mandatory.
Step 3 — Choose grouping and aggregation
In Grouping & Amount, Grouping Fields is a comma-separated list of field paths whose joined values form each claim's group key — one claim per distinct combination, typically partner, branch and scheme, or supplier and item. It is mandatory: the run fails on the first source row it meets without it (a source that returns no rows completes quietly). Set Partner Account Path and Branch Path when the partner and branch are not direct PartnerAccountId/BranchId columns on the source row; the generated claim's Partner Account and Branch come from these paths.
Then choose the Aggregate Function. Sum accumulates Amount Field across the group into one claim line (quantity 1), optionally transforming each contribution through Amount Formula, where the raw value is available as amount and the source row's own fields are in scope. Per Record maps one claim line per source row. Sum configured without an amount field fails the run.
Step 4 — Map the claim
Header Mapping and Line Mapping (section Mappings & Output) are JSON objects that map target field names to source paths or tokens. A plain value is read as a navigation path on the source row; the tokens are @Item:<item name> (look up an item by name), @const:<value> (a literal), @amount (the aggregated amount), @parent (the id of the claim header being written) and @format:{Path}-{Other.Path} (interpolate several paths into one string). A target field name that does not exist on the claim is stored in the record's custom-field bag rather than rejected, so check spellings. Header mapping is evaluated once from the first row that opens each group, before any amounts have been accumulated — keep it to values that are constant within the group key and do not use @amount there.
Set Owner Resolution: None, Resource User (the user behind the active field-sales resource of the claim's partner, matched on branch when the resource has a default branch) or Branch Owner (the branch's owner). An unmatched owner leaves the claim unowned rather than failing. Supplier Account is the party the claims are raised on; batching later skips claims that have none.
Step 5 — Add netting, if the claim type needs it
The Netting Leg section subtracts a second source's total per group before the claim is written — sale returns against a discount computation, payouts already made against a fresh calculation. Set Netting Source Entity and Netting Amount Field (mandatory once a source is named — the run fails rather than netting zero), and optionally Netting Filter Expression, Netting Partner Path, Netting Branch Path (both default to PartnerAccountId/BranchId), Netting Date Field and Netting Date Window. The netting window has no day count of its own, so Last N Days on the netting leg means today only. Netting reduces the first claim line, so it is meaningful for Sum setups; groups that net to zero or below produce no claim. Because save probes the netting query only when both its source entity and filter expression are present, a successful save does not prove a partially configured netting leg can run.
Step 6 — Configure settlement for the claim type
Under Claim Settlement Setups, create or review the active setup for this claim type; the settlement job picks the active setup whose Claim Type equals the claim's type exactly. Settlement Document decides what an approved claim produces: Credit Note (default), Invoice (bill the counterparty from the approved values), Adjustment (Part to Part) (an inventory adjustment from the approved quantities, the shortage-claim path) or None (nothing is created; only the configured event is raised). Apply To Open Invoices knocks a credit note off against the partner's open invoices oldest-first and applies to the credit-note path only; Auto GL Posting posts the resulting document (inventory posting for an adjustment); Raise Event Name publishes a business-rule event after settlement, best-effort. Header Mapping and Line Mapping shape the document with the tokens @approvedAmount, @approvedQuantity and @const:<value>.
Settlement Grouping is Per Claim (default, one document per approved claim) or Per Batch (consolidated), in which case Batch Grouping Fields, Batch Period (None or Month) and Batch Filter drive the batching sweep described in Trade claims. Save refuses Per Batch together with Adjustment and dry-runs the batch filter. A new settlement setup also starts in Simulate Mode; keep it there until approved quantities and mapped output agree with an independent calculation — in simulate mode the settle job reports the document it would have created and leaves the claim unsettled.
Step 7 — Run in simulate mode and read the job result
Run the setup with its Generate Claims action while it is still in simulate mode. The action does not generate inline: it enqueues a background run scoped to this one setup and returns the job run id, so open Setup → Administration → Jobs to read the outcome. The enqueue key is bucketed to the minute, so a double-click collapses into one run while a deliberate re-run a minute later goes through. The run summary reports, per setup, claims written, lines written and candidates skipped, and for a simulated run the number of candidates with a preview of the first few groups and amounts — without creating anything or flagging any source row. Auto-submit is skipped entirely in simulate mode. Compare a full cycle against the process being replaced and investigate every difference until it has an explanation.
Step 8 — Activate
Switch Simulate Mode off and mark the setup Active only when it should join scheduled group runs. A schedule-group run selects the active setups of its group and executes them in ascending Run Order; the manual Generate Claims action runs the selected setup regardless of its Active flag and ignores Run Order. The schedule itself is a job schedule: create one per schedule group under Setup → Administration → Jobs → Schedules for the Generate claims job with the group's stored value in the payload (for example {"scheduleGroup":"MonthlyD1"}) — no schedule is shipped. Optionally enable Auto Submit For Approval: each newly written claim is submitted to its approval process straight after the run, and submission failures (no process configured, already pending) are written to the application log without failing generation.
Expected result
Saving the setup proves the main query can return at most one sampled row without a compilation or runtime error; it does not prove the complete population or every optional netting configuration. A simulated run reports the candidate groups, lines and amounts in the job summary without creating target records or changing processed flags. After activation, the schedule creates normal claims in Draft status per eligible key and flags sources when configured. For a custom target, verify target and source state before every retry because header, lines and flags are not written in one transaction.
Verify the saved setup
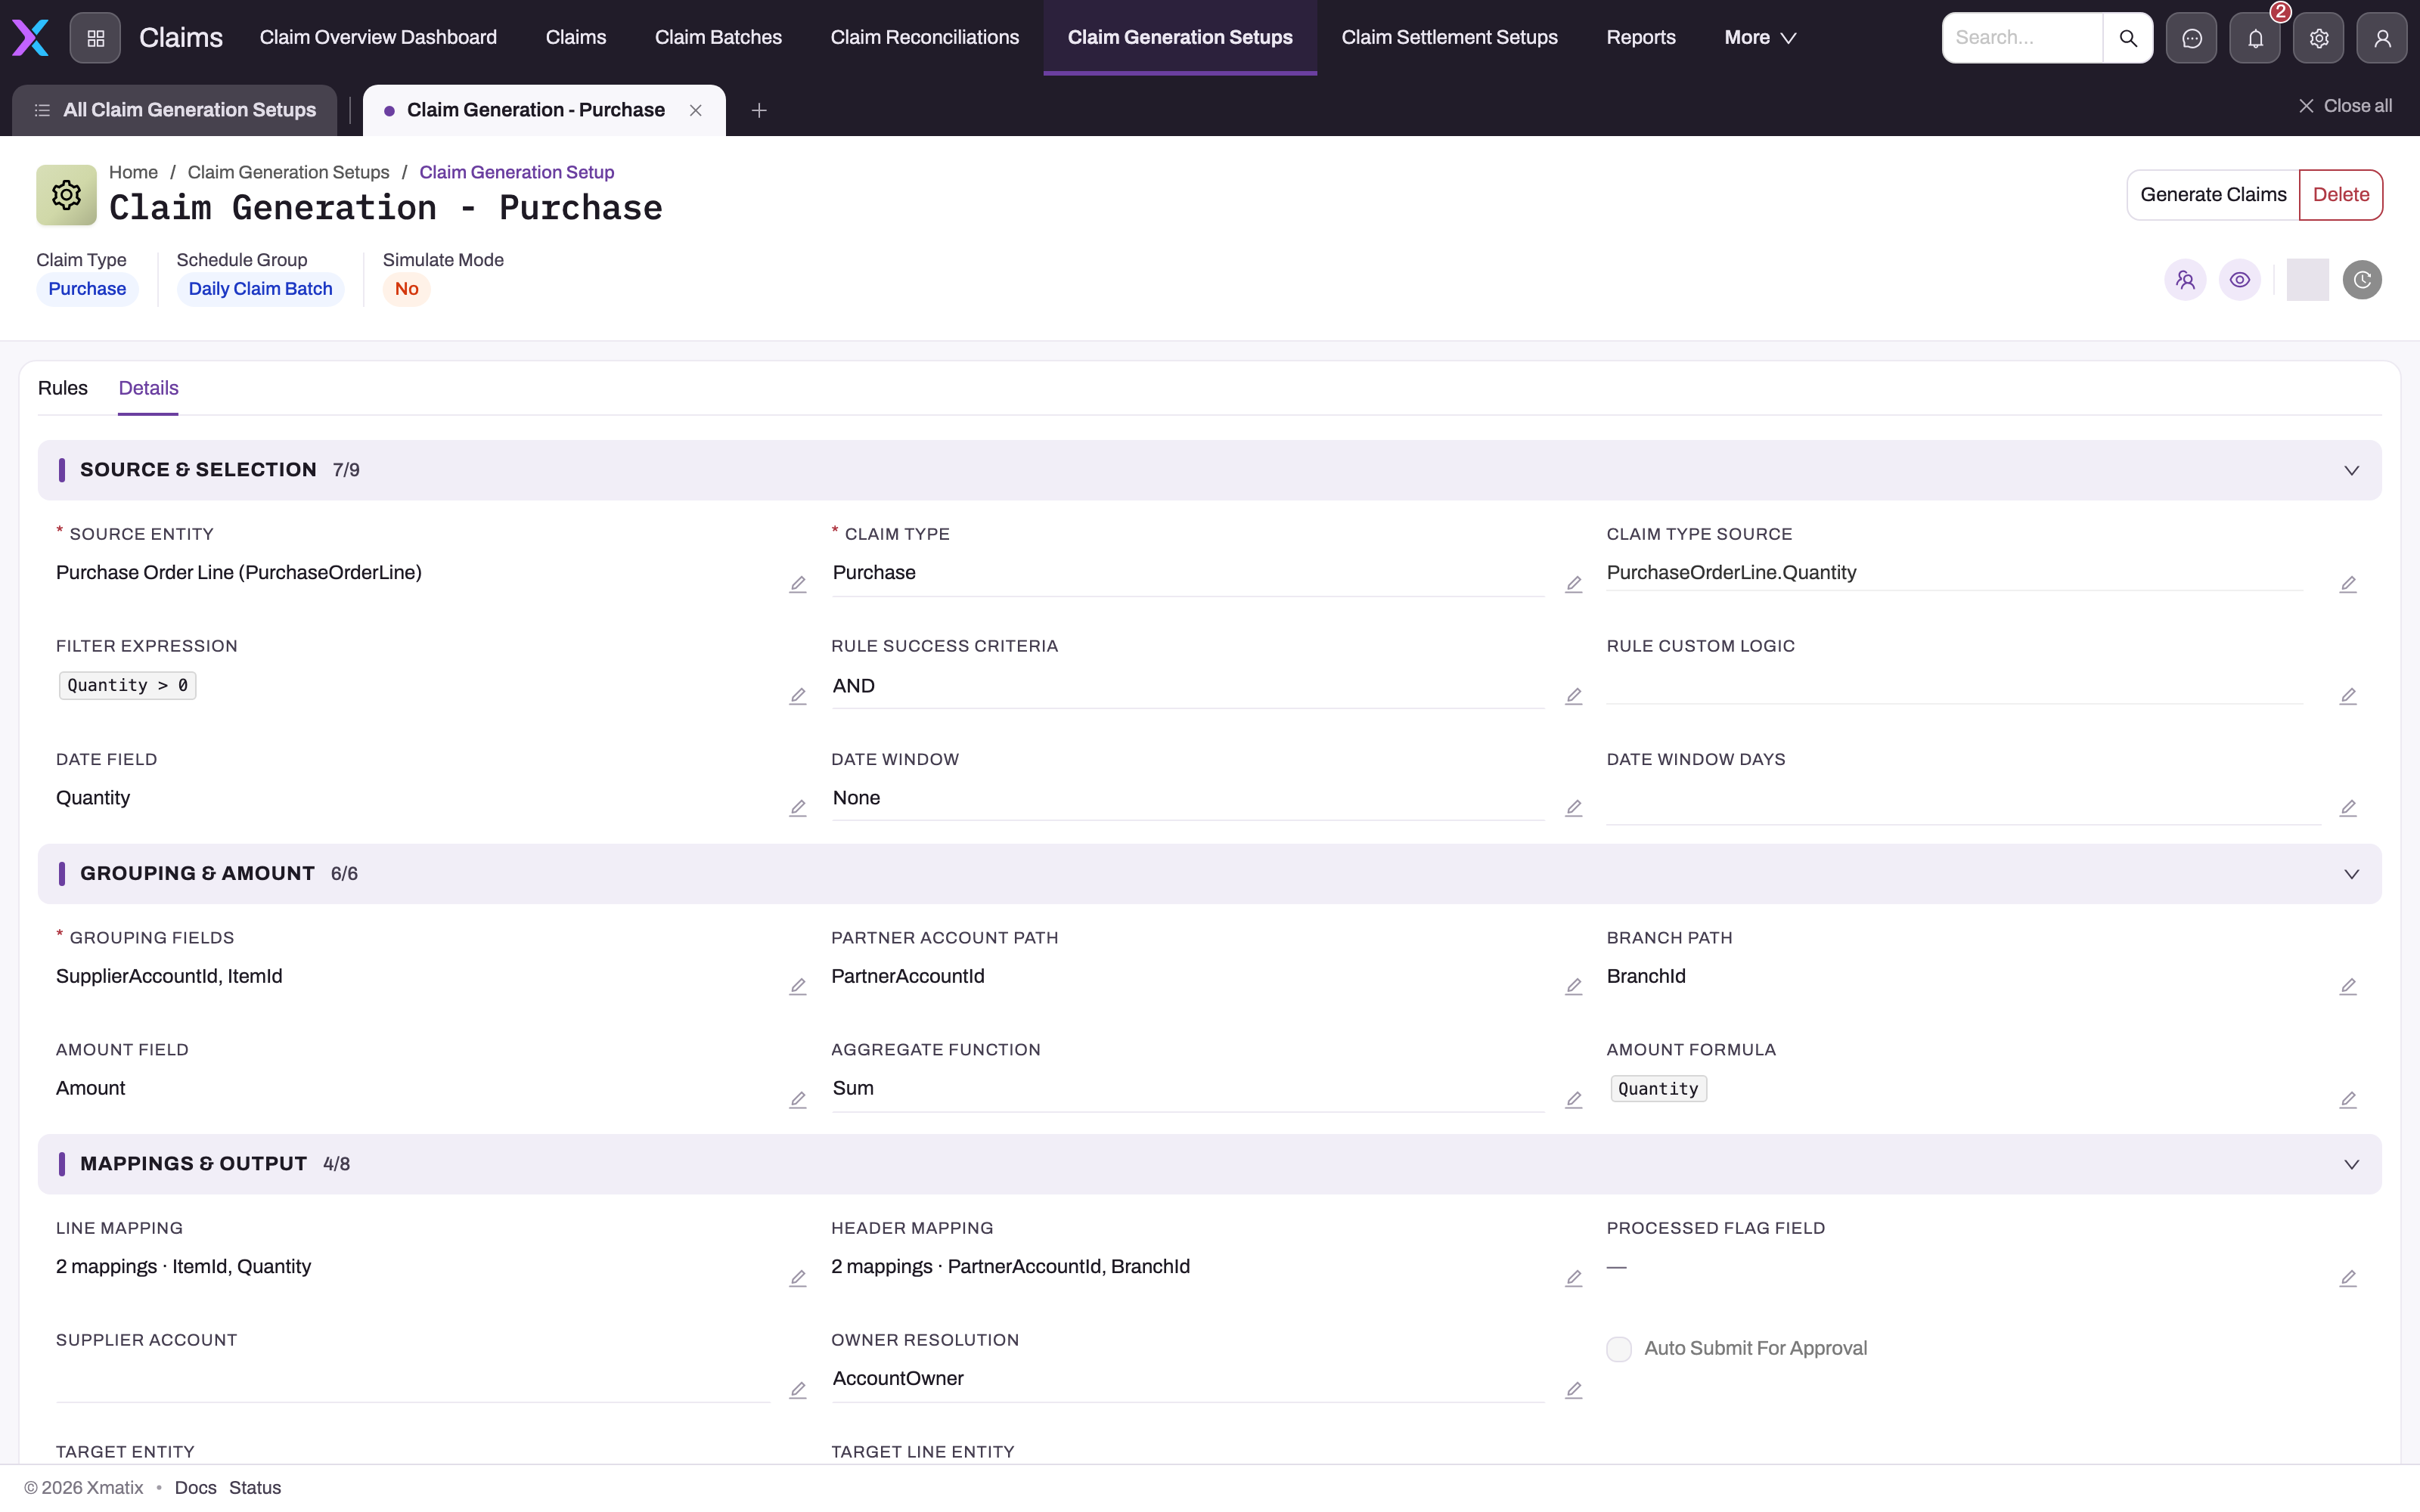
- 1
Header summary: Claim Type, Schedule Group and Simulate Mode. Simulate Mode = No means a run will write real claims.
- 2
Generate Claims enqueues a background run for this one setup, whether or not it is Active, and returns a job run id to follow on the Jobs screen.
- 3
Source & Selection: Source Entity, Claim Type, Claim Type Source, Filter Expression, Rule Success Criteria, Rule Custom Logic, Date Field, Date Window and Date Window Days.
- 4
Date Window None disables date filtering whatever Date Field says; a window with a blank Date Field is silently inert.
- 5
Grouping & Amount: Grouping Fields form the group key; Partner Account Path and Branch Path locate partner and branch when they are not direct columns; Amount Field, Aggregate Function and Amount Formula define the claim amount.
- 6
Mappings & Output: Line Mapping and Header Mapping JSON, the Processed Flag Field, Supplier Account, Owner Resolution, Auto Submit For Approval and the optional Target Entity pair.
The Details tab exposes every part of the pipeline in five collapsible sections: Source & Selection, Grouping & Amount, Mappings & Output, Netting Leg and Scheduling & Execution (Schedule Group, Run Order, Batch Size, Strategy Key, Active, Simulate Mode). Re-open each section after save and compare the persisted fields with the reviewed design; a successful query probe does not validate business meaning.
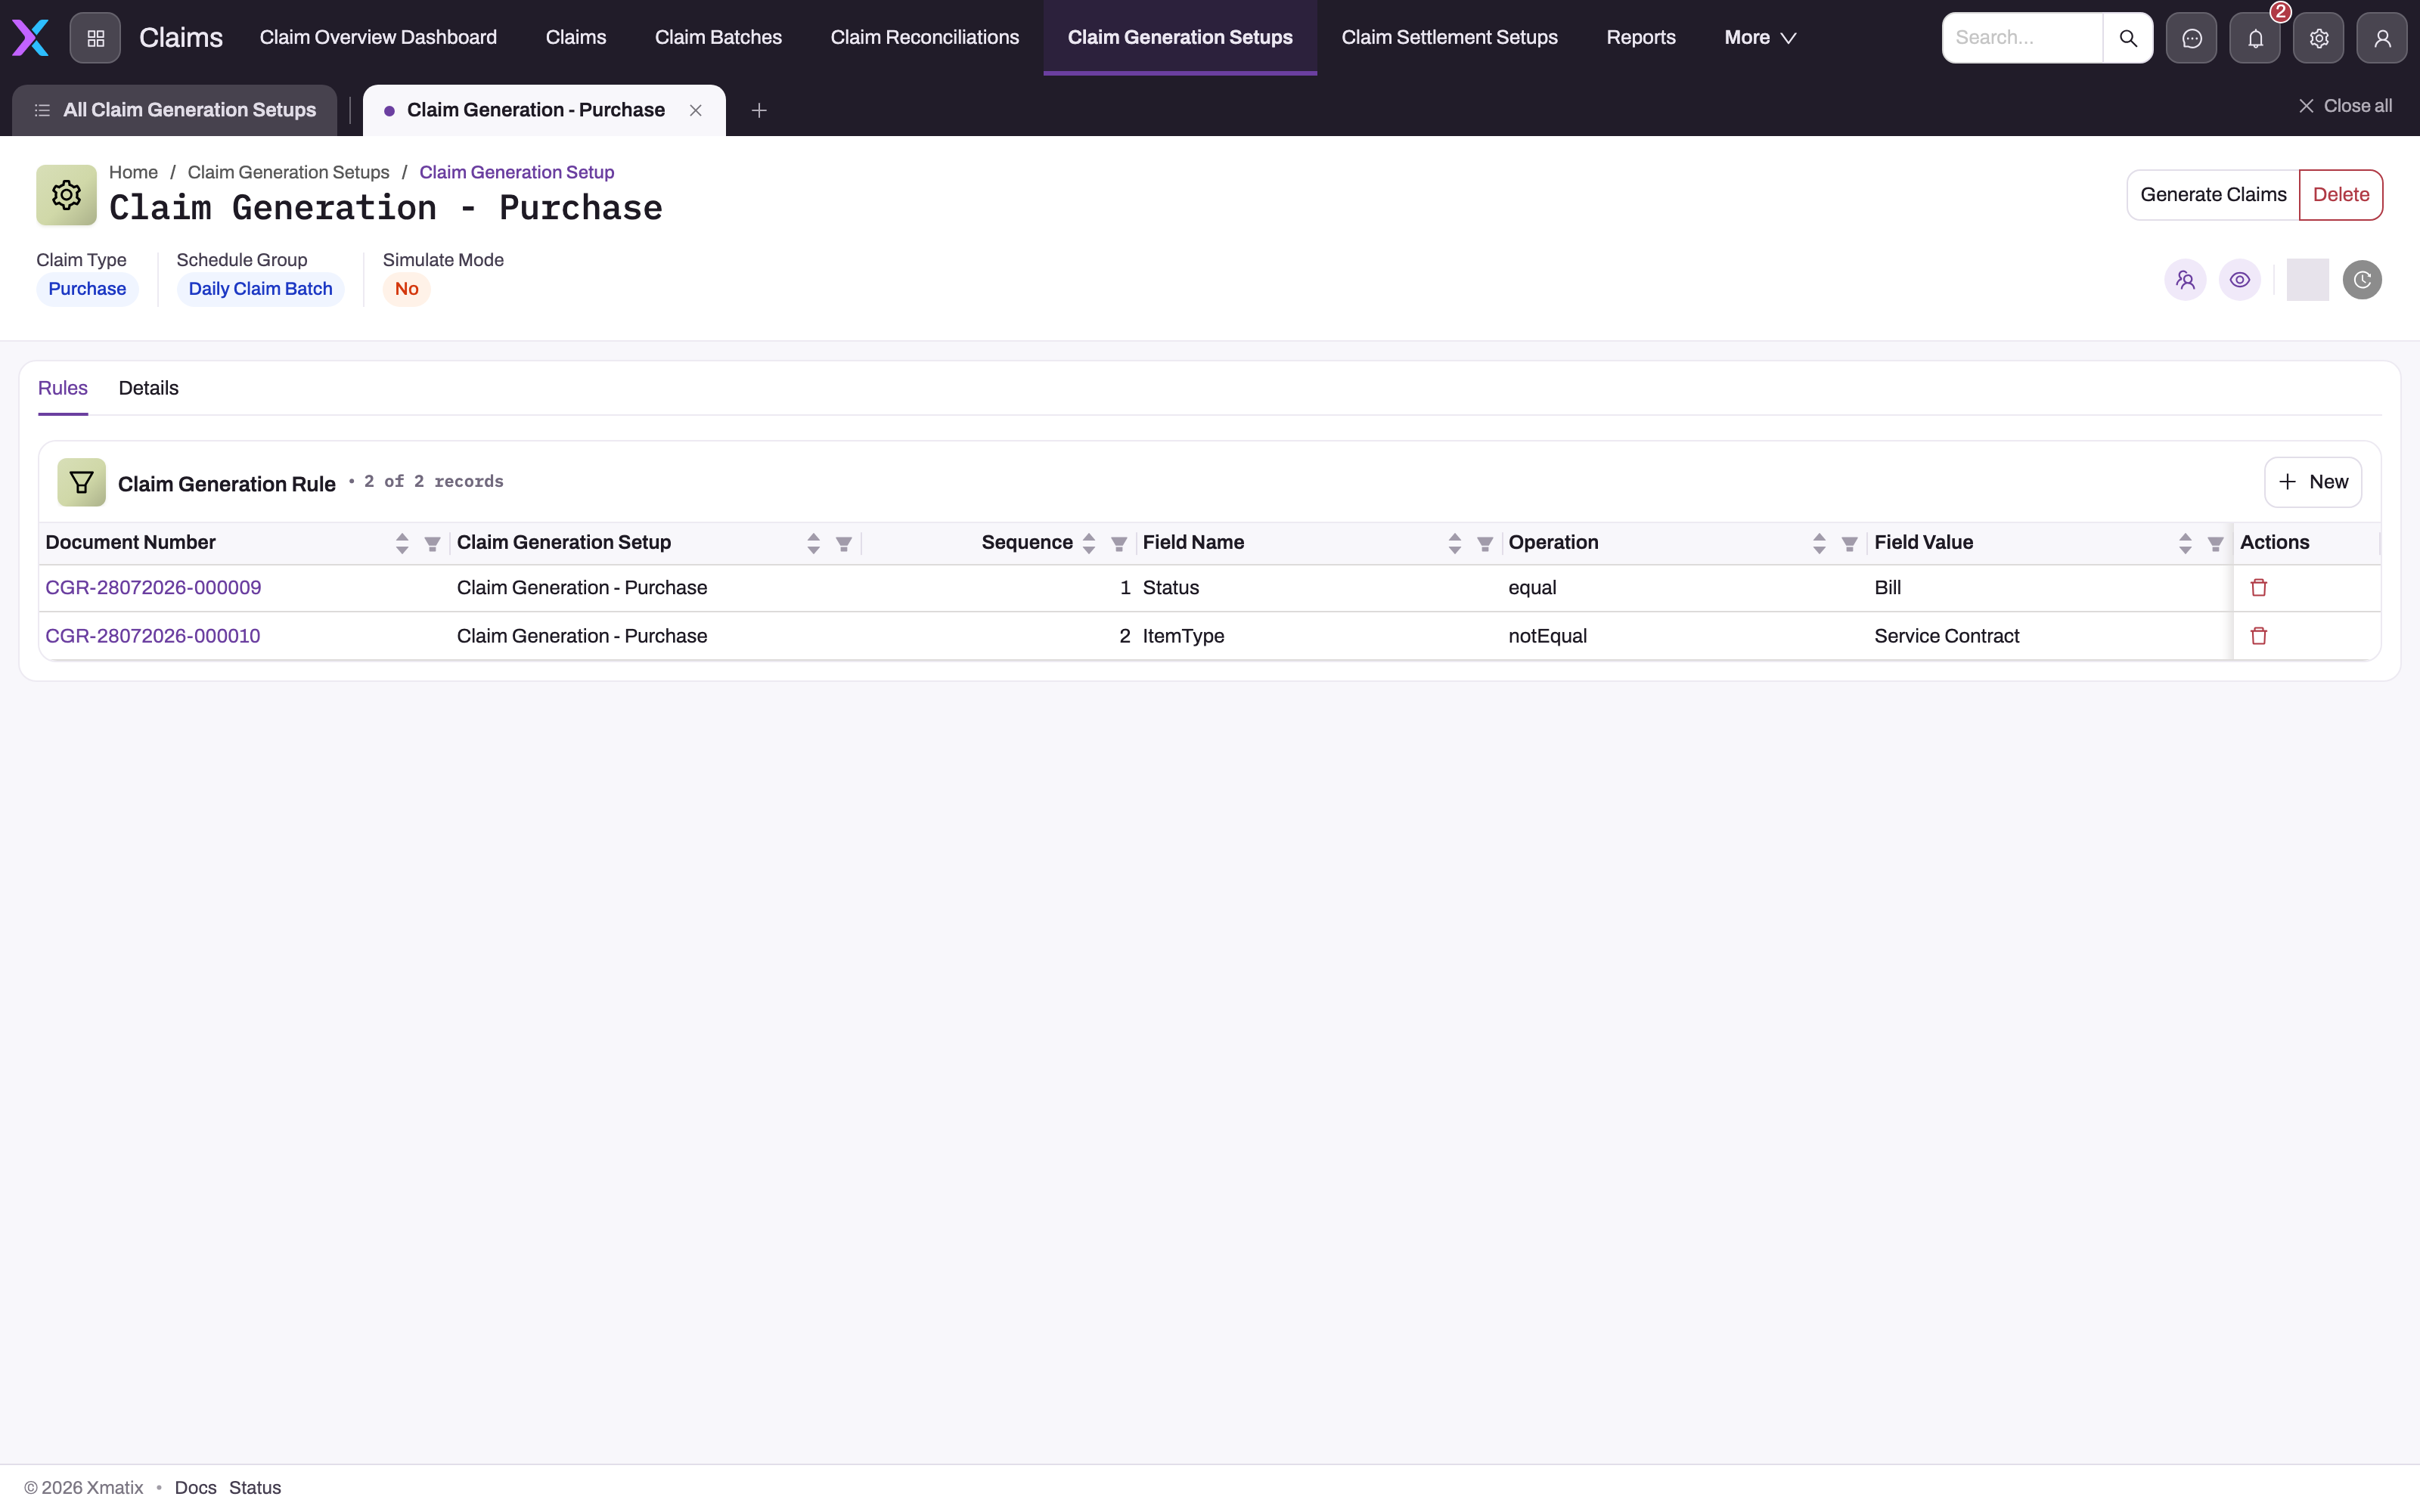
- 1
Rules tab of the setup; Details holds everything else.
- 2
New adds a rule row; rows are edited and deleted inline from the Actions column.
- 3
Sequence is the number a custom logic formula such as (1 AND 2) OR 3 refers to; a formula that names a missing sequence fails the run.
- 4
Field Name, Operation and Field Value make one condition. Operations: Equals, Not Equal, Greater Than, Less Than, Contains, In, Not In (the grid shows the stored operator code).
- 5
A row with a blank Field Name is ignored, which can leave a custom logic formula pointing at a sequence that no longer exists.
The Rules tab is the child rule list combined by Rule Success Criteria or the custom logic formula. Confirm Sequence, Field Name, Operation and Field Value for every row. When a filter expression is also present, it is combined with these rows rather than replacing them.
Common questions
What happens if two setups could sweep the same source records?
When a processed flag is configured, a successful claim write commits the claim, lines and source flags together, and later queries skip those rows. Without a flag, both setups can read them; the Claim generation key only prevents a second claim with the same claim type, group and run month. Partition overlapping setups explicitly and do not assume one setup's key protects another claim type or grouping.
How is the period in the generation key derived?
From the month the run executes in (UTC), not from the date window or the source dates. The key is ClaimType|GroupKey|Period with the period as yyyy-MM, so a setup re-run next month for the same group produces a second claim unless a processed flag excludes the already-claimed rows. Within a month a rerun is skipped and counted as such.
Can a setup write something other than a claim?
Yes. Target Entity and Target Line Entity redirect the output to a different document type, including a custom entity, written through the metadata-driven data service. Its source Processed Flag Field is mandatory because custom targets have no generation-key guard, and simulate runs for such a target never report skips. The writer persists header, child lines and source flags through separate calls; if a failure occurs after header creation but before source flagging, a retry may create another header. Inspect and repair the partial result before rerunning.
How do I test changes to a live setup?
Switch it back to simulate mode and run Generate Claims, then compare the job summary before re-activating. The save-time dry run guards the query itself, but only a simulation shows you the groups and amounts.
Why does the claim type list differ from the one on a claim?
The setup's Claim Type picklist is the generation engine's own vocabulary of coded scheme and incentive types, and generated claims carry those values verbatim. The Claim entity's own claim-type picklist drives Perform Populate Lines on manually created claims and does not need to overlap; what matters for settlement is that an active Claim Settlement Setup exists for exactly the value the setup stamps.