
A new business object in xMatix is a sequence, not a single click: the entity itself, then its fields and picklists, then a list view, a form layout, and finally a place in an app's navigation. Each step is quick, but none is optional — an entity created and abandoned after step one renders an empty list page and appears in no menu. This walkthrough builds a working entity end-to-end, using a warranty-claim tracker as the running example, and calls out the traps: names you cannot change later, types you cannot change once data exists, and the app placement everyone forgets.
Prerequisites
- The model-management capability (
setup.metadata.model.manage) on one of your profiles; picklist edits also needsetup.metadata.picklists.manage, and the app-placement step needssetup.metadata.apps.manage. - A sketch of the fields and their types. Types are effectively permanent once records exist, so this five-minute sketch is the highest-leverage part of the whole procedure.
- If several kinds of this object need different forms or rules, decide the record types now — scoping is easier to build in than to retrofit.
Procedure
Step 1 — Create the entity
Go to Setup → Design Studio → Entities and use New. In the New Metadata Entity dialog, give it a Label ("Warranty Claim"), an Internal Name (WarrantyClaim — ASCII letters and digits only, no underscores), a Collection Label ("Warranty Claims") and a Description, and pick a color and icon so the entity is recognizable in navigation. The behavior toggles (create, edit, delete, search, list view, audit) default sensibly — leave auditing on for anything with business consequence. On save, the entity is ready immediately: there is no publish step. Note that the platform appends a suffix to custom internal names, so the stored name differs from what you typed — anything that addresses the entity by name, including API integrations, must use the stored name shown on the entity after creation.
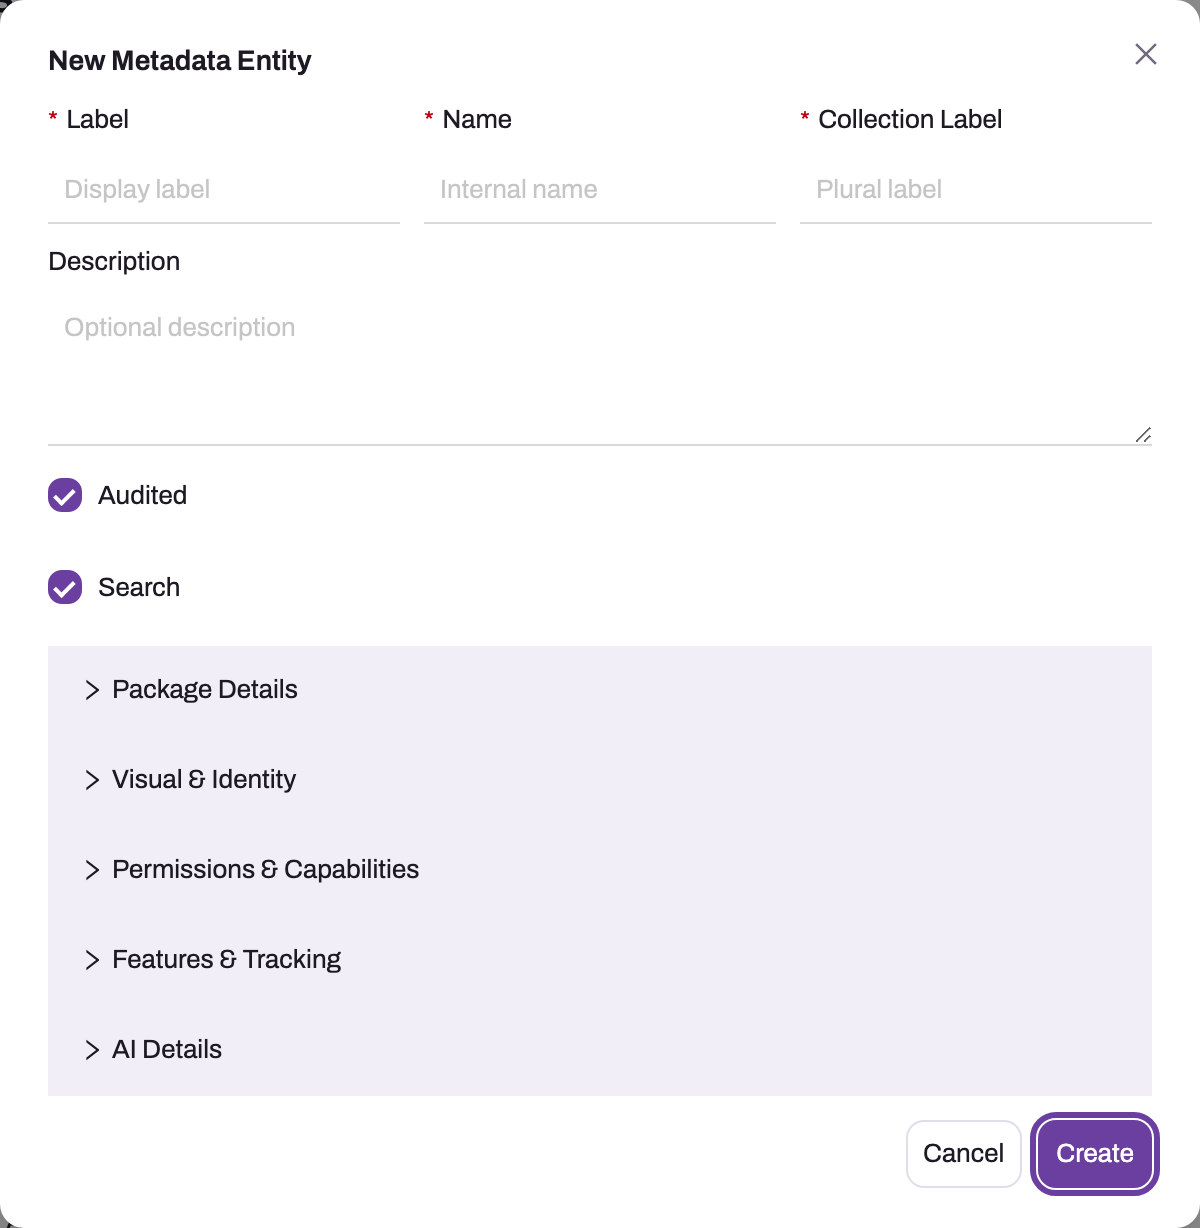
- 1
Label is the singular name users see.
- 2
Name is the system key used by APIs and automation.
- 3
Collection Label is the plural form used for lists and navigation.
- 4
Audited and Search enable history and discoverability for the entity.
- 5
Advanced sections expose package, identity, permission, feature and AI settings.
Step 2 — Add the fields
Open the entity and go to Schema → Fields, then New per field: Label, Internal Name, Field Type, plus the per-type settings (length for text, precision and scale for numbers) and behavior toggles (Required, Unique, Audited, Active). System fields — id, name, owner, record type, created and modified stamps — already exist; you add only the business attributes. Three constraints to respect: pick each type as if you cannot change it, because once the entity holds data you cannot; making a field required later, after data exists, also demands a default value in the same change; and unique can only be set while the entity is empty. Skip lookup fields here — they come from relations in the next step.
Step 3 — Define picklist values
For each choice field, open the field's row menu and choose Manage PickList Values. Add the options — each has a stored value and a display label — then drag to order them, mark one default if creation should preselect it, and set colors or icons where the value benefits from being scannable in lists. Get the stored values right the first time: labels can change forever, but changing a stored value after records hold it orphans those records. If the option set is shared with other entities, create it under Setup → Design Studio → Global Picklists instead and bind the field to the global list.
Step 4 — Link to other entities
Where the new entity references another — a warranty claim belongs to an account and an item — create relations under Schema → Relations with New. Choose the Related Entity, and accept or adjust the generated Lookup Field Name and labels; saving the relation creates the lookup field on your entity automatically (this is the only way lookups are made). Leave Cascade Delete off unless the child records genuinely cannot outlive the parent, and mark the relation required only when a claim without an account is meaningless.
Step 5 — Create a list view
Under Experience → Views, use New to define the entity's default list: a name and label, an optional filter condition and sort order, then the row action Columns to pick and order the columns users see. Create the columns explicitly — a view with none falls back to generic columns, which reads as broken to users. Mark the view as the default. Additional filtered views ("Open Claims", "My Claims") are cheap and can come later.
Step 6 — Design the layouts
Under Experience → Layouts, use New to create a layout row (Label, Internal Name, Description, layout type), then open it with Web Design to lay out sections and fields in the visual designer. Create two: a Create layout for the new-record form and a View layout for the record page, and mark each the default of its type. If you skip the Create layout, the create dialog falls back to whatever layout it can find — functional, but rarely the form you want. The designer itself, record-type variants and mobile layouts are covered in design a form layout.
Step 7 — Place the entity in an app
A new entity appears in no app menu by itself. Go to Setup → Design Studio → Apps, open the app that should carry it, and use Manage Items to add the entity to the app's navigation at the position you want. Users reach records through apps, so until this step the entity is reachable only by administrators through Setup — the most commonly skipped step in the sequence.
Step 8 — Verify as a user
Open the app as a user would, find the entity in navigation, and create a record: the Create layout should render your sections, picklists should offer the right options in the right order, lookups should resolve, and the saved record should appear in the default view with the columns you chose. Confirm with a user holding a normal (non-administrator) profile too — entity access is granted per profile, and a missing grant shows up as the entity simply not existing for that user; see the administration guide for profile access.
Expected result: an authorized user can find the entity in the intended app, create a record with the designed form, reopen it with the View layout, and retrieve it from the configured list view.
Common problems
The entity's list page is empty and the form is bare. The entity exists but the follow-through is missing — fields, a view with columns, and layouts are separate steps (2, 5 and 6). A bare entity is valid; it just has nothing to show.
The entity is missing from the app menu. Either step 7 was skipped, or the viewing user's profile has no read access to the entity — navigation only shows entities the user can read. Check the app's items first, then the profile.
An API caller gets "entity not found". Almost always the caller is using the internal name as typed rather than the suffixed stored name — check the entity's stored name and use exactly that. Caches can also lag a few minutes after creation; retry before assuming anything is wrong. If a correct name still fails much later, escalate to support rather than re-creating the entity — re-creating makes the problem worse.
A field's type or constraint change is rejected. The entity has data. Type changes are blocked outright; required needs a default supplied in the same change; unique is refused entirely. For a type change, create a new field, migrate the values, and retire the old one.
Common questions
When can users start entering data?
As soon as steps 1–2 are done, technically — there is no publish or deployment step, and the data API accepts records the moment the entity exists. In practice, wait until the view, layout and app placement (steps 5–7) are in place, because until then the experience is fallback columns and fallback forms. Access matters too: users see the entity only once their profiles grant it.
Why is the stored name different from the name I typed?
The platform suffixes custom internal names so they can never collide with system entities and fields — including ones added in future product updates. The label users see is unaffected. The practical rule: after creating anything custom, read the stored name off the entity or field and use that everywhere a name is required, especially in integrations and formulas.
Should I set up record types now or later?
Now, if you already know the variants — a record type is cheap to create (Schema → Record Types), and layouts, validations and views are easier to author scoped from the start than to split later. Later is fine too: unscoped metadata keeps applying to all types, so adding a record type is additive. What to avoid is modeling variants as separate entities when they are really one object in two shapes — merging entities later is genuinely painful.