
A portal goes from nothing to serving visitors in one sitting: create the site, add its pages, publish the data views the pages read, publish, and check the result as a visitor. This page walks the whole path in the order that avoids backtracking. The step worth the most care is the data views — they decide what the portal can read at all, and publishing one is a security decision as much as a content one.
Prerequisites
- The portal-management capability (
setup.portals.manage), and the Portals module enabled for your organization. - The entity views you intend to publish already exist — a portal data view serves an entity view (a column set plus a base filter), so shape the view first. See the data model.
- A slug for the portal: lowercase letters, digits and hyphens, up to 63 characters. It becomes the portal's hostname label, so choose it as deliberately as a domain name.
Procedure
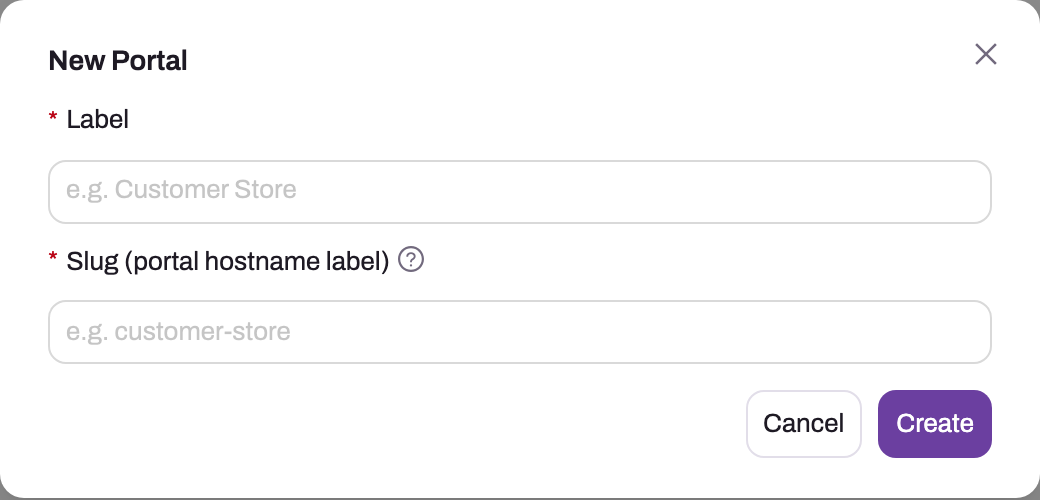
- 1
New Portal opens from New on Setup → Feature Hub → Portals → Portals and creates an empty site shell.
- 2
Label is the readable portal name administrators see; it pre-fills the slug as you type.
- 3
Slug becomes the hostname label (lowercase letters, digits and hyphens, up to 63 characters) combined with your organization's slug, so choose it like a domain name.
- 4
Create saves the portal and opens its detail page with the General, Pages and Data Views tabs; the site is not published yet.
- 5
Cancel discards the dialog without creating a portal.
The portal shell needs only a readable label and a stable slug. Creating it does not expose content: pages, data views and the site itself each retain their own explicit publication checkpoint.
Step 1 — Create the site
Open Setup → Feature Hub → Portals → Portals and click New. Give the portal a label — the slug pre-fills from it, and you can adjust it before creating. You land on the portal's detail page: a General tab for the site, a Pages tab, a Data Views tab, and a Publish action in the header for when everything below is ready.
Step 2 — Configure the site
On General, write a description (visitors see it in the portal footer) and review the serving and signup switches. Anonymous visitors off means only signed-in external users can view the portal. Self-service signup admits signup requests, while Create customer on signup controls whether a successful signup also receives a new consumer Account and Contact; that second switch defaults on. Each new signup receives an email to set a password and membership of this portal. The Advanced section holds the theme, navigation and settings documents: theme tokens become the portal's colors, and the navigation document defines the header menu. Leave navigation empty and the published pages, in their sort order, become the menu automatically — a perfectly good place to start.
Step 3 — Add pages
On Pages, Add Page asks for a label, a path (/ is the home page; then /products, /support, and so on), the page type, the audience and a sort order. Designed pages are free-form layouts; Entity list pages render one published data view. Two audiences exist: Public pages serve anonymous visitors and signed-in users alike, Authenticated pages serve signed-in external users only. Creating page rows early costs nothing — an unpublished page is invisible to the portal — so lay out the whole page tree now and publish only the finished ones.
Step 4 — Publish the data views
On Data Views, click Publish Data View: pick the entity, then one of its views, an audience, and a page size cap (50 rows per request by default, up to 250). The view's columns and base filter bound exactly what an authored page can query. Publishing a Public view grants the tenant's shared anonymous principal read access to the entity, so treat its result as public information; Authenticated views instead run as the signed-in visitor and serve "my records" scenarios. The full semantics are in Portal pages and data views.
Step 5 — Give the pages content
Open a page from the list to edit it. A Designed page carries a layout document, drafted on the page and served only once published — it can use layout blocks (grids, tabs, collapsible sections), display widgets, cards and statistics, and the portal data list widget that renders a published data view. An Entity list page names its published data view in the page's embed target instead, and renders it as a paged table. Whatever you edit stays a draft: the portal serves only the published snapshot, so a live page can be reworked safely.
Step 6 — Publish each page
Use Publish draft on each finished page. Publishing snapshots the current draft as the served version and marks the page Published; a page still showing Draft or Empty is not part of the portal. Re-publishing after later edits is the same action.
Step 7 — Publish the site
Click Publish in the page header. The site becomes servable — visitors receive only its published pages and active data views — and its hostname is registered automatically: a single label combining the portal slug and your organization's slug (portal shop for organization acme serves as shop-acme) under the platform's portal domain. No DNS work is needed for this hostname; putting the portal on your own domain is a separate task — see Publishing, hostnames and custom domains.
Step 8 — Verify as a visitor
Open the portal hostname in a private browser window, so you see it without your administrator session. Check the menu, open every page, and read the data lists: what you see is exactly what any anonymous visitor sees — public data views deliberately return identical results for everyone, signed in or not. If a first visit immediately after publishing returns not-found, retry after a minute: hostname registration is picked up on the next lookup.
Expected result
The portal register shows one site with the intended label, stable slug, address and published state. A private browser can open every published public page, authenticated pages still require an external sign-in, and each data list exposes only the columns and rows authorized by its published view. If administrator and visitor results differ unexpectedly, unpublish the affected page or site first, then re-check its audience, view filter and anonymous-access setting before restoring service.
Common problems
The portal returns not-found even though everything is published. In order: the site's Active switch is off (an inactive site is never served, regardless of publish state), Anonymous visitors is off and you are not signed in as an external user, or the Portals module is disabled for the organization.
A page renders "has no published content yet." The page was published while its draft was empty, or an embed page's target names no data view. Add the content, then Publish draft again — publishing snapshots whatever the draft holds at that moment.
A data list shows an error or no rows. Check that the data view is Active, that its underlying entity view returns rows inside the application, and — for a portal created moments ago — that the portal's visitor identity has finished provisioning: open the portal in Setup, save it once, and retry.
Common questions
Can one organization run several portals?
Yes. Each portal has its own slug, hostname, pages, data views and theme, and they are managed independently on Setup → Feature Hub → Portals → Portals. What they share is the tenant-wide anonymous principal and its Portal Anonymous profile. Active public data views across all portals collectively manage that profile's entity grants, so review authored public exposure across portals together; see How portal security works.
Do site changes need a re-publish too?
No — the site's own settings (theme, navigation, description, switches) apply to the live portal when you save them. The draft/publish gate exists at the page level (content) and the site level (served at all): it is page content that never changes without an explicit Publish draft.
What does deleting a portal do?
It removes the portal's configuration — the site, its pages and its published data views — but does not delete the organization's tenant-wide anonymous visitor principal or your business records. A portal is a window onto the data, not a copy of it. Deletion cannot be undone, so when you only want the portal offline, retract it with Unpublish instead.