
Publishing is what turns portal configuration into a served website, and the hostname question — where visitors reach it — has two answers: the platform hostname every published portal gets automatically, and custom domains you bring yourself. This page covers the site-level publish and retract actions, then both kinds of hostname. Custom domains are the newest part of the portal stack and may not yet be enabled in every environment; the platform hostname works everywhere.
Prerequisites
- The portal-management capability (
setup.portals.manage). - A portal ready to serve — pages published, data views active. See Build and publish a portal.
- For a custom domain: control over the domain's DNS zone. Verification and serving both work through DNS records you create.
Procedure
Before publishing, open the portal's General tab and confirm the label and slug, keep Active aligned with the intended serving state, and review Anonymous visitors: with it off, only signed-in external users can view the site.
Step 1 — Publish the site
On the portal's detail page (Setup → Feature Hub → Portals → Portals, open your portal), click Publish in the header. The portal becomes servable — visitors receive only its published pages and active data views — and its platform hostname is registered automatically: a single label combining the portal slug and your organization's slug (portal shop, organization acme → shop-acme) under the platform's portal domain. There is no DNS work on your side for this hostname.
Step 2 — Retract when you need to
Retracting mirrors publishing at each level. Unpublish on the site stops serving to all visitors immediately; Unpublish on a single page removes just that page. The site's Active switch is the hard kill switch — an inactive site is never served, regardless of publish state. None of these delete anything: republishing restores service from the same configuration.
Step 3 — Add a custom domain
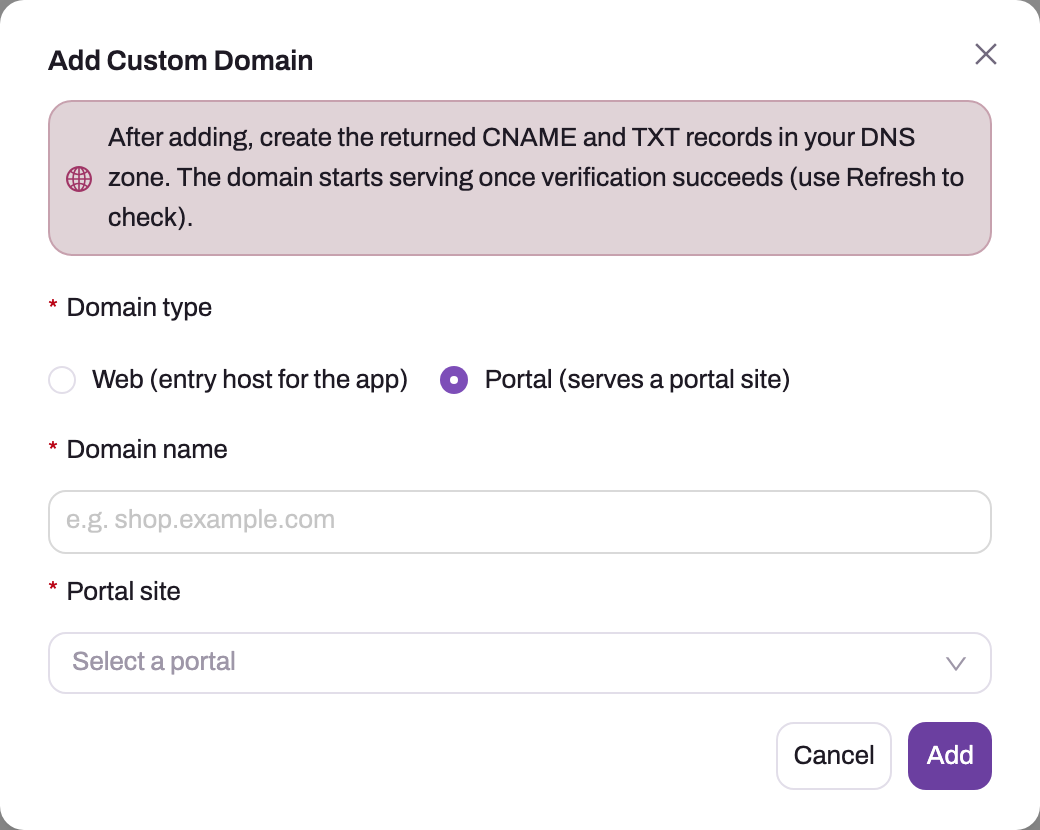
Open Setup → Feature Hub → Portals → Domains and click Add Domain. Choose the domain type Portal (serves a portal site), pick which portal the domain should serve, and enter the hostname — a subdomain such as shop.example.com is the dependable choice (see the apex note under Common problems). The domain is recorded, and its row shows the DNS records to create.
- 1
The banner states the contract: create the returned CNAME and TXT records in your DNS zone, then use Refresh on the row to re-check verification.
- 2
Domain type Portal serves a portal site on this hostname; Web would make it an entry host for the application itself.
- 3
Domain name is the visitor-facing hostname; a subdomain such as shop.example.com is the dependable choice because apex names cannot be CNAMEs.
- 4
Portal site binds the hostname to one portal; the portal's own published and active state still decides whether anything is served.
- 5
Add records the mapping and exposes the DNS proof; it does not publish the portal or change DNS for you.
The Portal domain choice reveals the Portal site selector. This relationship is explicit: the domain record routes one hostname to one authored portal, while the portal's publish and active state still decide whether there is anything to serve.
Step 4 — Create the DNS records
In your DNS zone, create the two records from the domain's row: a CNAME pointing your hostname at the returned target, and a TXT record that proves control of the name. Verification is DNS-based — the certificate for your hostname is issued once the records resolve.
Step 5 — Verify and serve
Use the row's Refresh action to re-check; the status updates only when re-checked, so how fast you verify is mostly how fast your DNS changes propagate. Once the domain shows Verified, it serves the portal directly — same content, same security, your name in the address bar. The platform hostname keeps working alongside it.
Step 6 — Remove a domain when retiring it
Remove detaches the hostname from the platform edge and it stops serving immediately. Delete the CNAME from your DNS zone as well, so the name is not left pointing at nothing.
Expected result
The portal is published and active, its platform hostname serves the expected published snapshot, and every attached custom hostname shows Verified before it is announced to visitors. Both names render the same content and enforce the same audience rules. After retirement, the platform no longer serves the removed hostname and the obsolete DNS record is absent; if verification or routing disagrees, keep the platform hostname available while you correct DNS rather than repeatedly deleting and recreating the domain.
Common problems
Verification never completes. Almost always the DNS records: one of the two is missing, was created in the wrong zone, or has not propagated yet. Check both records with a DNS lookup tool from outside your own network, then Refresh again.
The domain verifies but the portal shows not-found. The domain is attached, but the portal behind it is not being served — the site is unpublished or inactive. Domains route traffic; they do not publish anything.
An apex domain (example.com, no subdomain) won't verify. Apex records cannot be CNAMEs in standard DNS. If your DNS provider supports ALIAS/ANAME records or CNAME flattening at the apex, use that; otherwise serve the portal on a subdomain such as shop.example.com.
Common questions
What is the difference between the Web and Portal domain types?
A Portal domain serves a portal site directly on that hostname. A Web domain is an entry host for the application itself — it redirects your own team onto the app. When you are putting a portal on your own name, pick Portal.
Does unpublishing the site break a verified custom domain?
No — the domain stays attached and verified. With the site unpublished, requests to it return not-found until you publish again, so you can retract and restore service freely without re-doing any DNS work.
Can visitors still use the platform hostname after I add a custom domain?
Yes. Adding a custom domain adds a name; it does not replace the platform hostname, and both serve the same published portal.