
A stock transfer moves inventory from one branch (and optionally one company) to another. The normal form is a two-step movement made of two documents: an Outward transfer that you create and release, and an Inward transfer that the release generates at the destination. Release Outward posts the source movement and puts the quantity into a dedicated in-transit state; Inward Receive records what physically arrived; Post Inventory on the inward document takes the quantity out of transit and into the destination branch. Both release and receive have selective variants, so partial dispatches are normal. A Single Step transfer books both sides in one posting for moves that do not travel.
Start from the transfer register
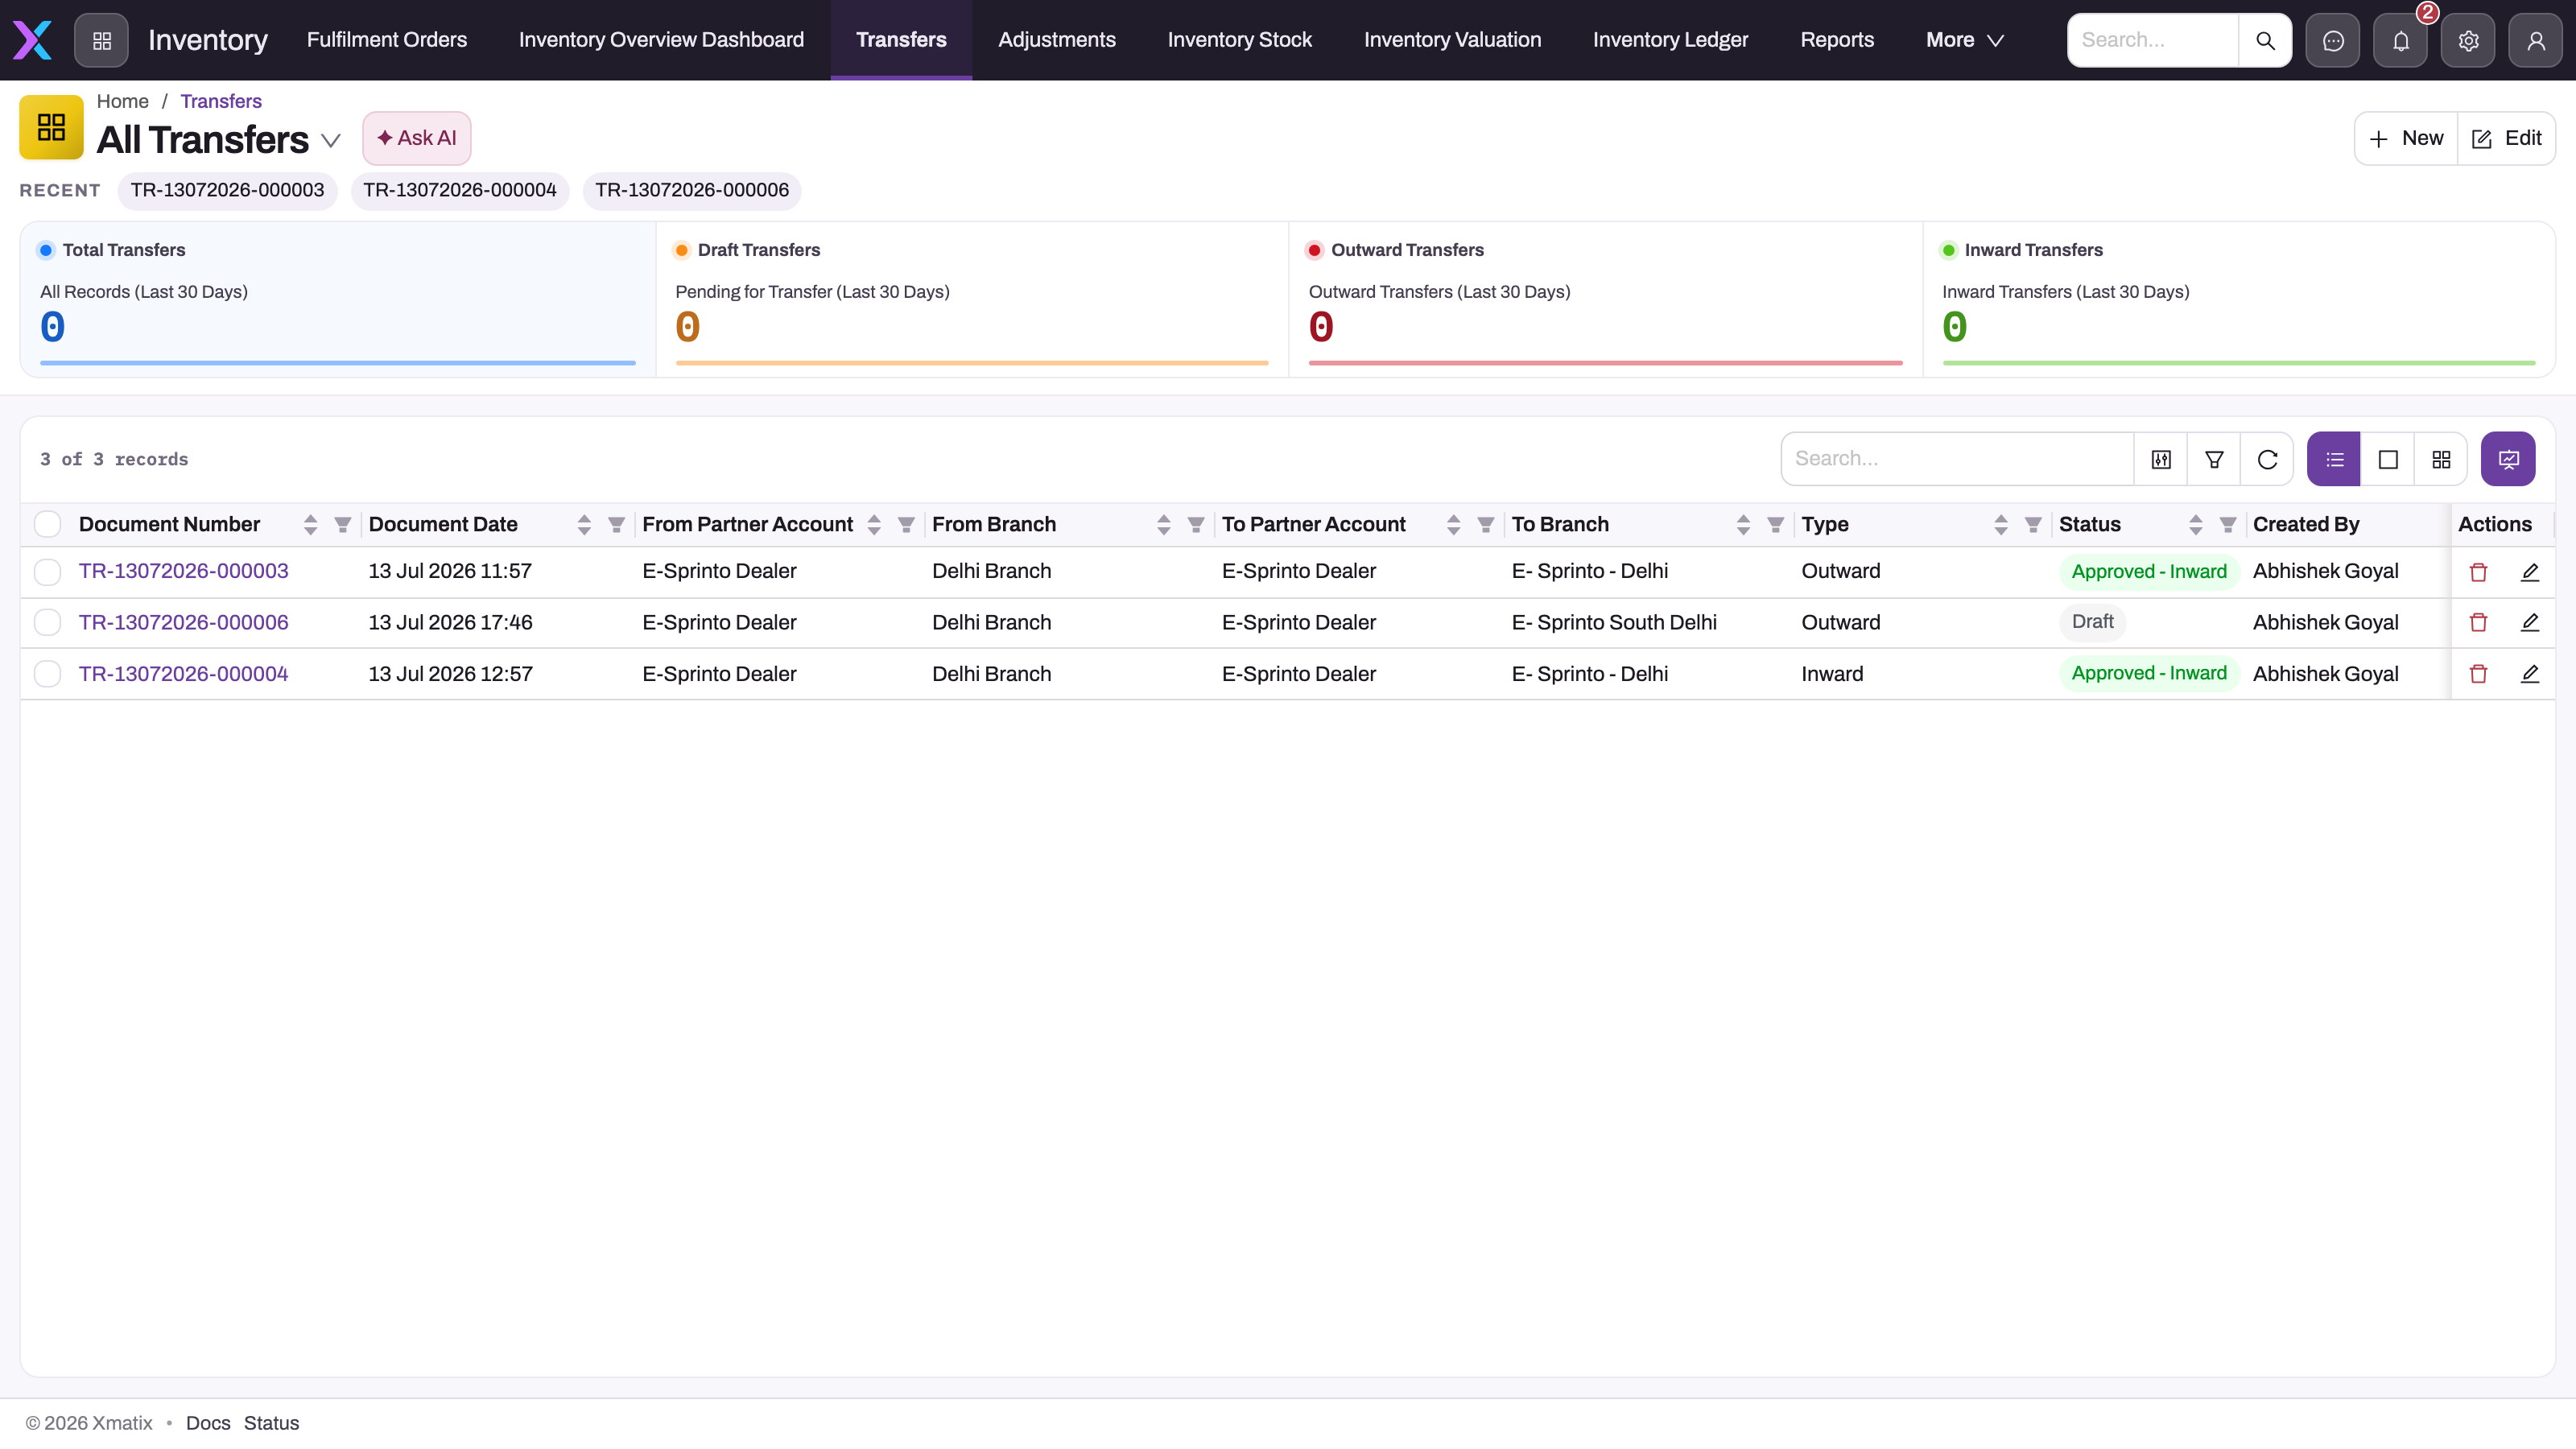
- 1
New creates an Outward or Single Step transfer; Inward documents are only ever generated by a release.
- 2
Summary cards count the last 30 days' documents by type.
- 3
The document number opens the transfer — Lines, Details and Related tabs.
- 4
From Partner Account / From Branch are the source; To Partner Account / To Branch the destination.
- 5
Type tells you which side of the movement a row is: Outward, Inward or Single Step.
- 6
Status is a label maintained by your approval flow; the Progress Details flags on the document are the machine state.
Inventory → Transfers (default view All Transfers; the same list is a fixed tab of the Warehouse app) shows one row per document: document number and date, From Partner Account and From Branch, To Partner Account and To Branch, Type (Outward, Inward or Single Step) and Status. The summary cards count the last 30 days' documents by type. An outward document and the inward document it generated are two rows here — filter by the destination branch or open either one and follow its Related Documents link to reach the other.
Prerequisites
- Access to the Inventory (or Warehouse) app through your security profile. Release, receive and posting are separate entity actions and can be granted independently of create/edit.
- Sufficient on-hand stock at the source branch for each line — a release that would take a stock bucket negative is rejected.
- The source and destination branches, and for a cross-company transfer the destination partner account (To Partner Account and To Branch are mandatory).
- A Received By user on the document: release refuses to run until one is set.
- For lot-tracked items, the source lot on each line — the release clones it into a destination lot automatically.
Procedure
Step 1 — Create the outward transfer
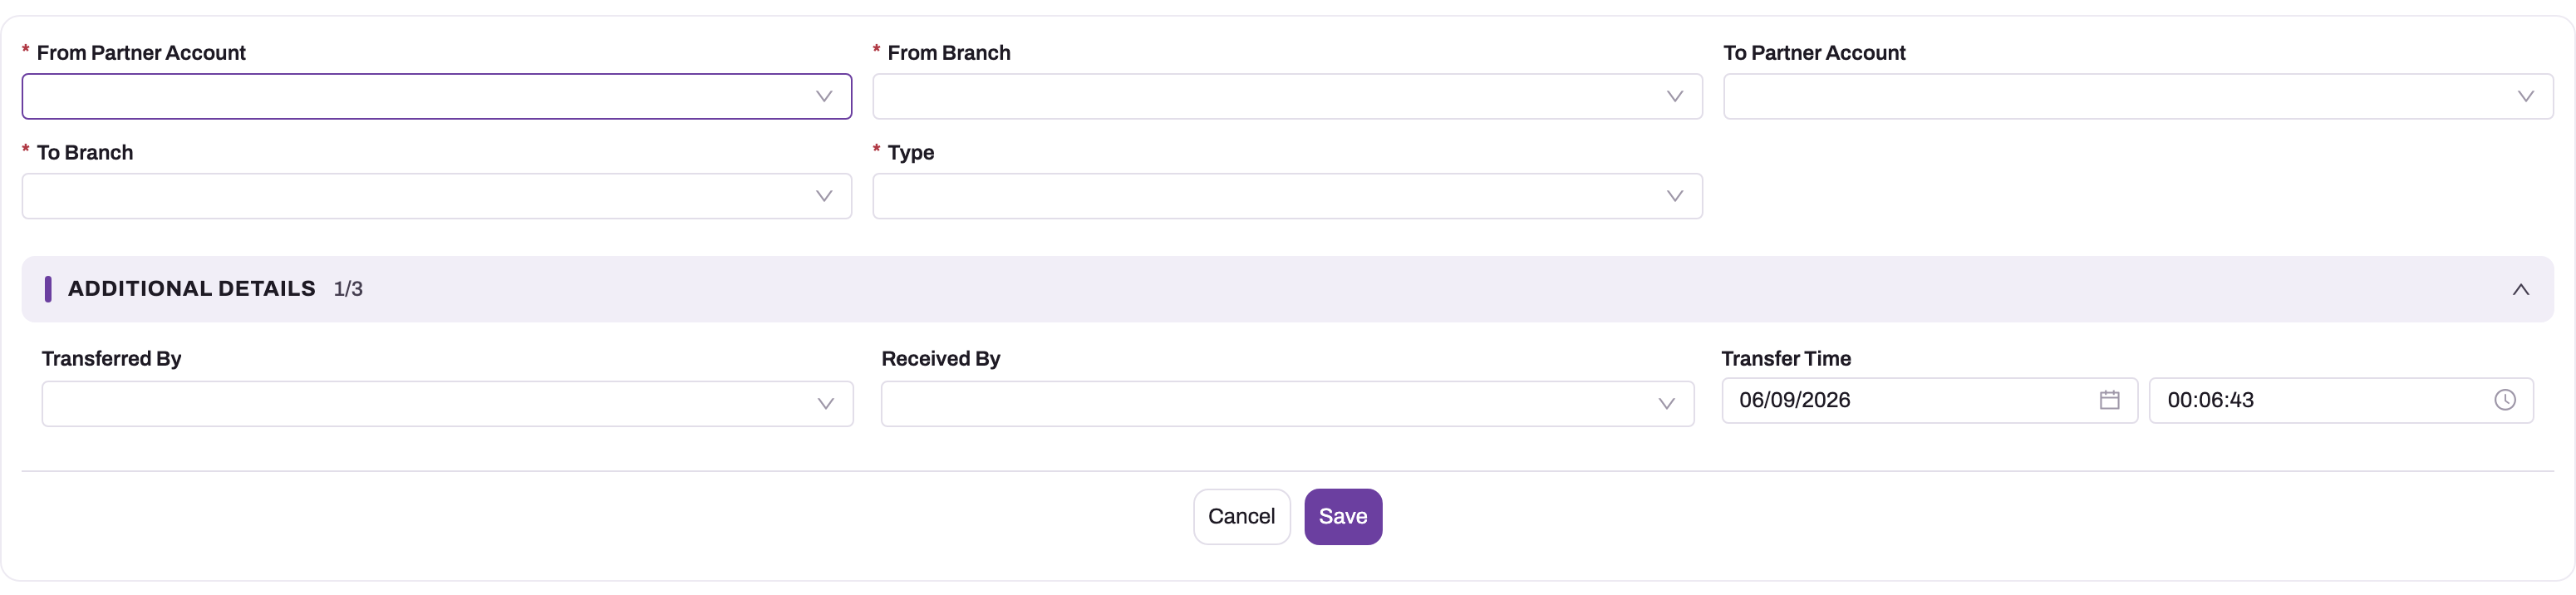
- 1
From Partner Account and From Branch — the source whose stock the release will reduce.
- 2
To Partner Account — the destination company for a cross-company transfer; lot clones are owned by it.
- 3
To Branch — the destination; the in-transit balance is held against it.
- 4
Type: Outward (two-step, generates an Inward document at release) or Single Step (both effects in one posting).
- 5
Received By is required before Release Outward will run; Transferred By and Transfer Time record the hand-over.
- 6
Save creates the header only — no stock moves until a release or posting action.
Click New. The form asks for From Partner Account, From Branch, To Partner Account, To Branch and Type, with Transferred By, Received By and Transfer Time under Additional Details. Choose Outward for a two-step movement or Single Step when the goods do not travel — you cannot create an Inward document by hand; only a release generates one. Set Received By now (the destination user who will accept the goods) so the release is not blocked later. Document date and transfer time are stamped at creation and cannot be changed; saving the header moves no stock.
Step 2 — Add lines
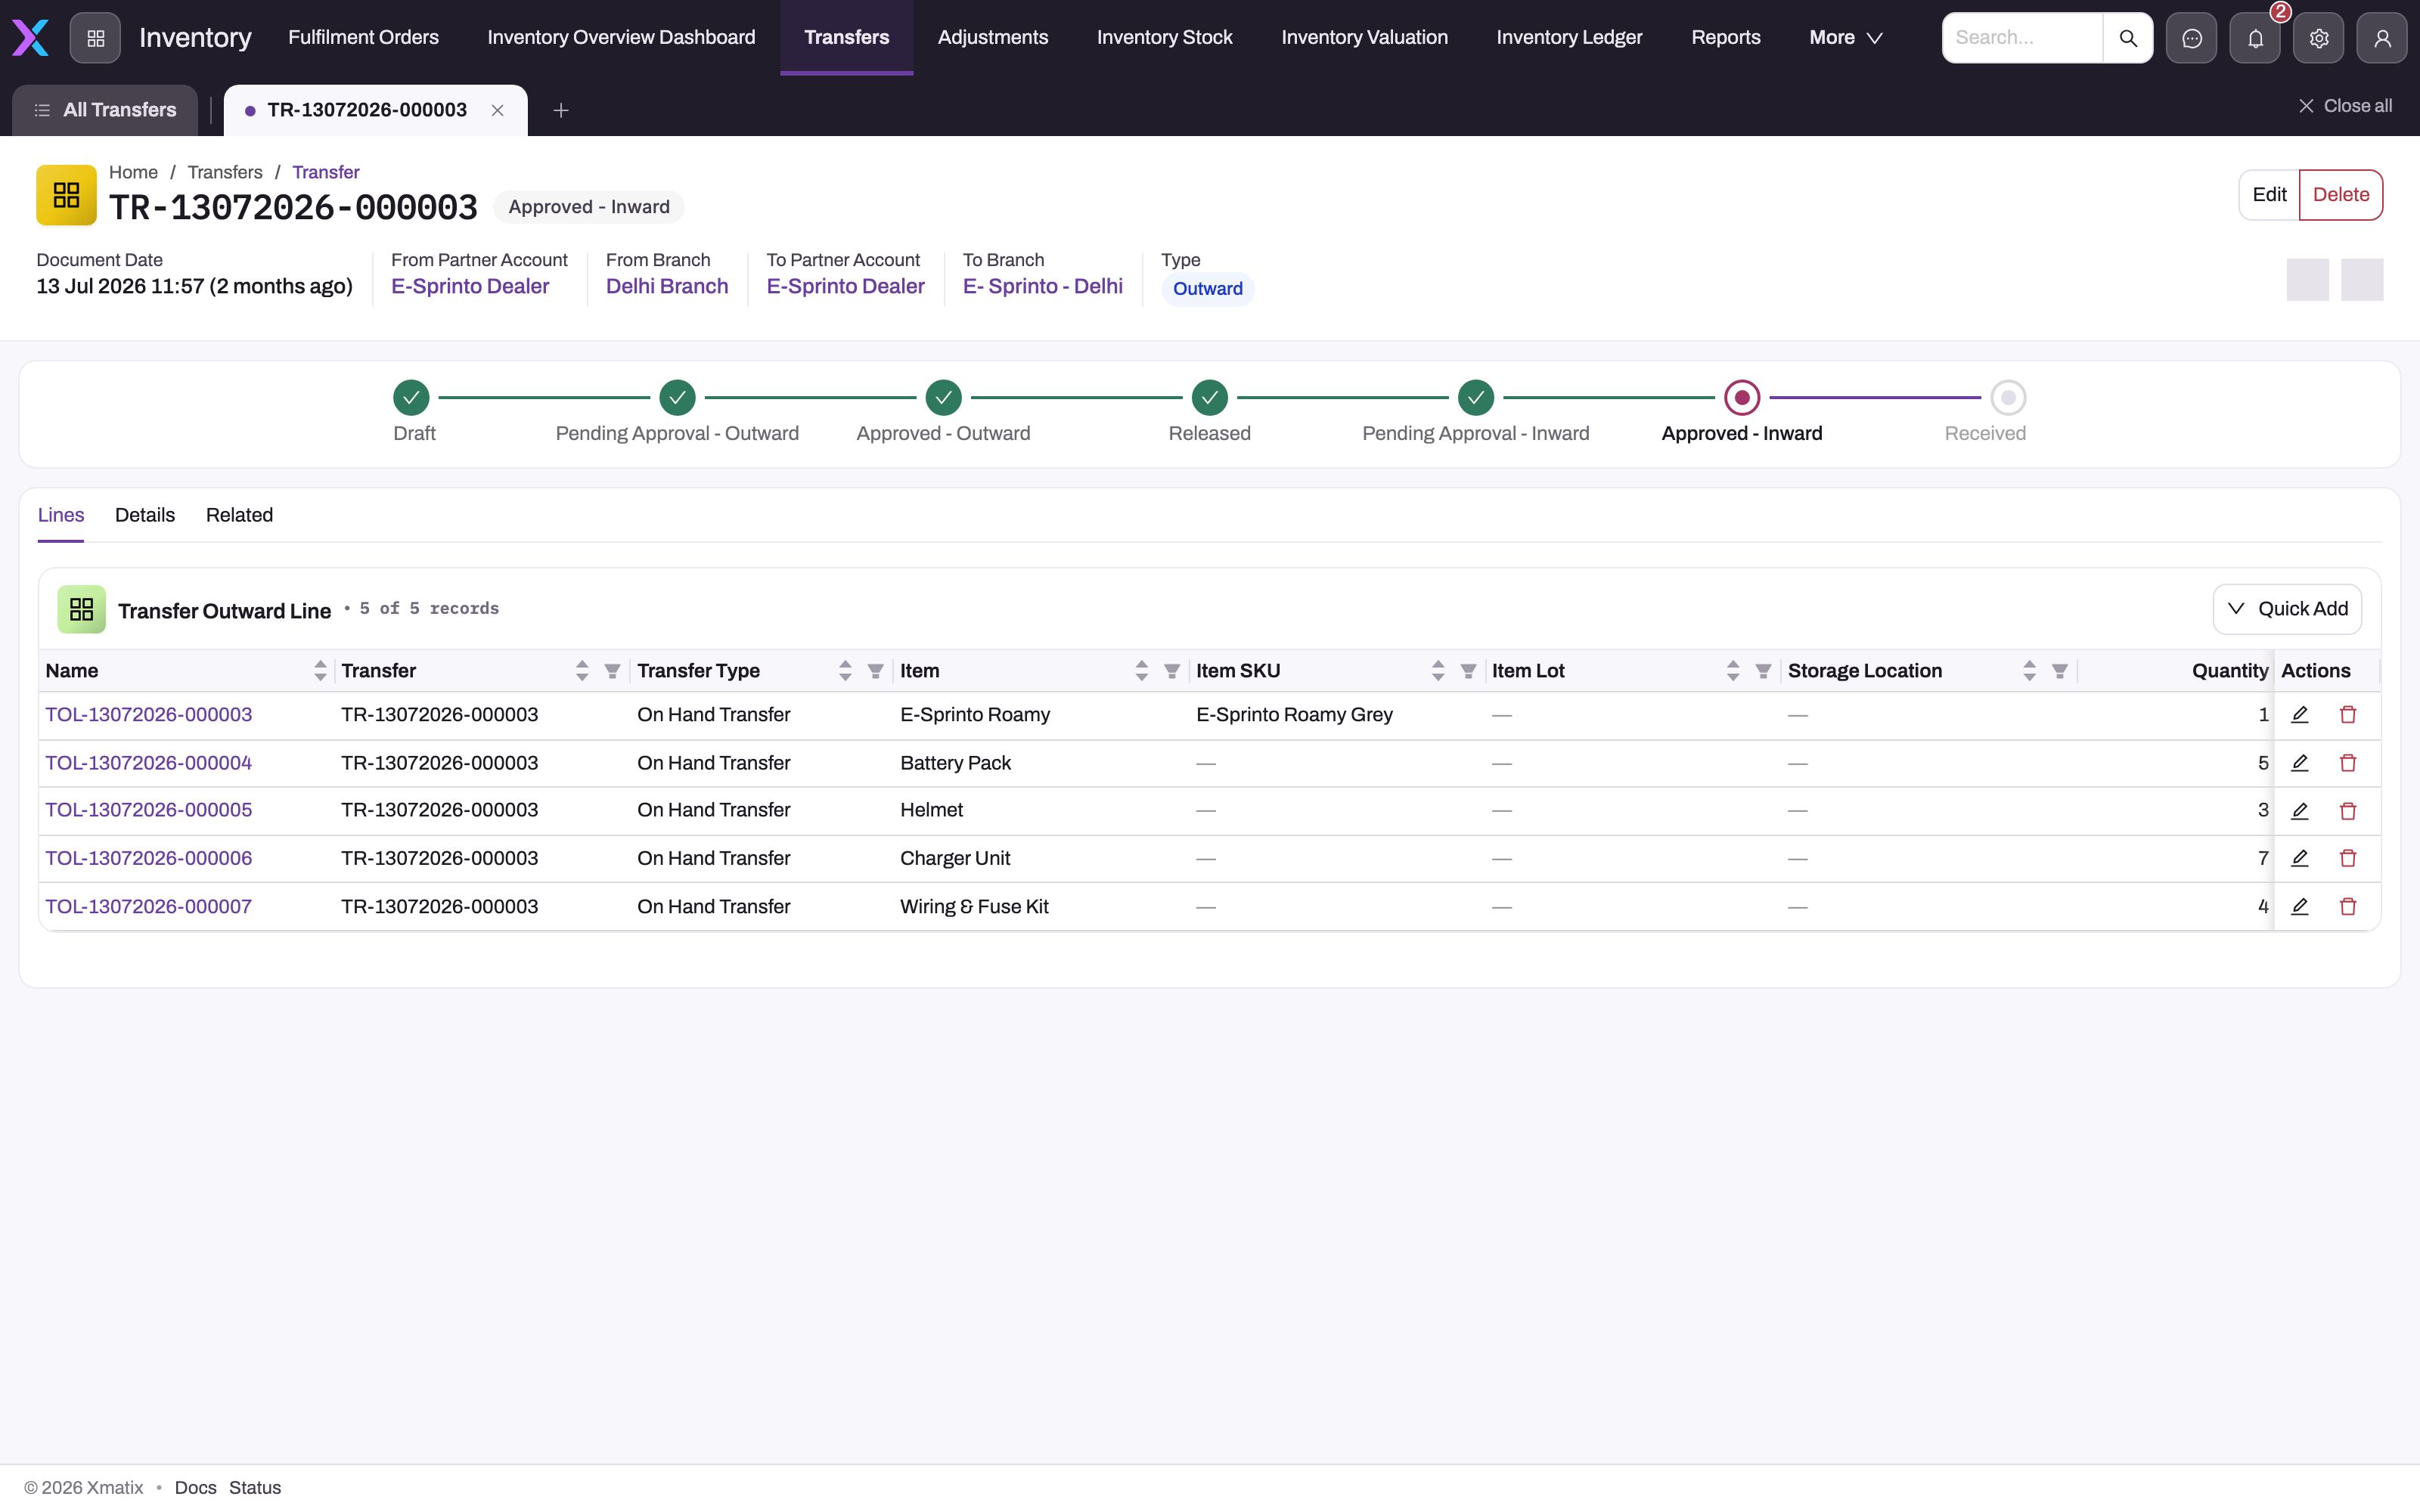
- 1
The stepper shows the Status label's stages from Draft to Received; reconcile stock from the Progress Details flags, not from this label.
- 2
Lines is the default tab — add lines here before releasing.
- 3
Quick Add opens the inline line editor; saving a line moves no stock.
- 4
Transfer Type: On Hand Transfer moves physical stock through transit; Pending Deliveries Transfer re-buckets sold-but-undelivered stock without a transit leg.
- 5
Item Lot and Storage Location name the source bucket the release draws from.
- 6
Quantity is the plan; open a line for Released, Pending Release, Closed and Pending Inward quantities.
On the saved transfer, the Lines tab holds one Transfer Outward Line per item, SKU and lot: the item, the source Storage Location the goods leave, the Item Lot for lot-tracked items, Quantity (the plan), and Unit Cost (carried to the destination unchanged). Each line also has a Transfer Type: On Hand Transfer (the default) moves physical stock through transit; Pending Deliveries Transfer re-buckets stock already sold but not delivered and posts no in-transit quantity. Compare the lines against the pick list before releasing — a wrong lot or location is the usual cause of an Insufficient stock rejection.
The line's quantity trail is where partial movements stay readable: Released Quantity is the running total dispatched, Pending Release Quantity is what is still on the shelf, Closed Quantity is what the destination has confirmed received, and Pending Inward Quantity is released but not yet received.
Step 3 — Release outward
At dispatch, run Release Outward to release every line's pending quantity, or Selective Release Outward to choose lines and enter a Requested Quantity per line (up to its pending release quantity; empty releases the line's full pending amount). Each release:
- posts a Transfer Outward ledger entry per line for the released quantity, reducing the source branch's stock, and adds the same quantity to a transit stock row held against the destination branch with no storage location — goods in transit sit in no bin;
- for lot-tracked items, clones the source lot into a destination lot (same batch, serial, cost and dates, owned by the destination partner and branch) and moves the quantity into that lot's transit counter;
- creates a new Inward transfer at the destination with one Transfer Inward Line per released line, cross-linked to this document, carrying the released quantity and unit cost.
A second selective release creates a second inward document. The outward document's Outward Released flag turns on only when no line has pending release quantity left; until then it can be released again. Release is refused when the document is already fully released, when Received By is empty, or when a release would take source stock negative — fix the line and release the same document again rather than raising another transfer.
Step 4 — While the goods travel
The released quantity is in neither branch's on-hand stock. It shows on the destination's transit row (a stock balance with no storage location) and, for lots, in the destination lot's Transit counter, and the outward line shows it as Pending Inward Quantity. Investigate an overdue transfer here before considering any adjustment.
Step 5 — Record the inward receipt
At the destination, open the generated inward document, count the delivery and choose the receiving Storage Location on each line. Then run Inward Receive to receive every pending line in full, or Selective Inward Receive to choose lines and enter the quantities that arrived and any Damaged Quantity. Receiving adds to the line's Received Quantity, marks it received and writes the confirmed quantity back to the outward line's Closed Quantity. It does not post stock: nothing reaches the destination's on-hand until Step 6.
Receive what actually arrived, in one pass per line. Once any quantity is received on a line, the unreceived remainder becomes the line's Shortage Quantity and its pending quantity drops to zero — a short receipt closes the line rather than leaving it open for a second delivery. The document's Inward Received flag turns on when every line has been received, and the receive actions refuse to run again after that.
Step 6 — Post the received inward quantity
Run Post Inventory on the inward document (it requires at least one received line). For every inward line without a ledger reference it posts a Transfer Inward entry for the line's quantity into the receiving storage location, removes that quantity from transit, and posts separate Shortage, Damaged and Excess entries where those quantities were recorded — so the destination's available stock reflects what arrived, while the shortage stays visible as its own bucket instead of being written off silently. The receiving lot's storage location is updated to the line's location. Posting is idempotent: lines that already carry a ledger reference are skipped.
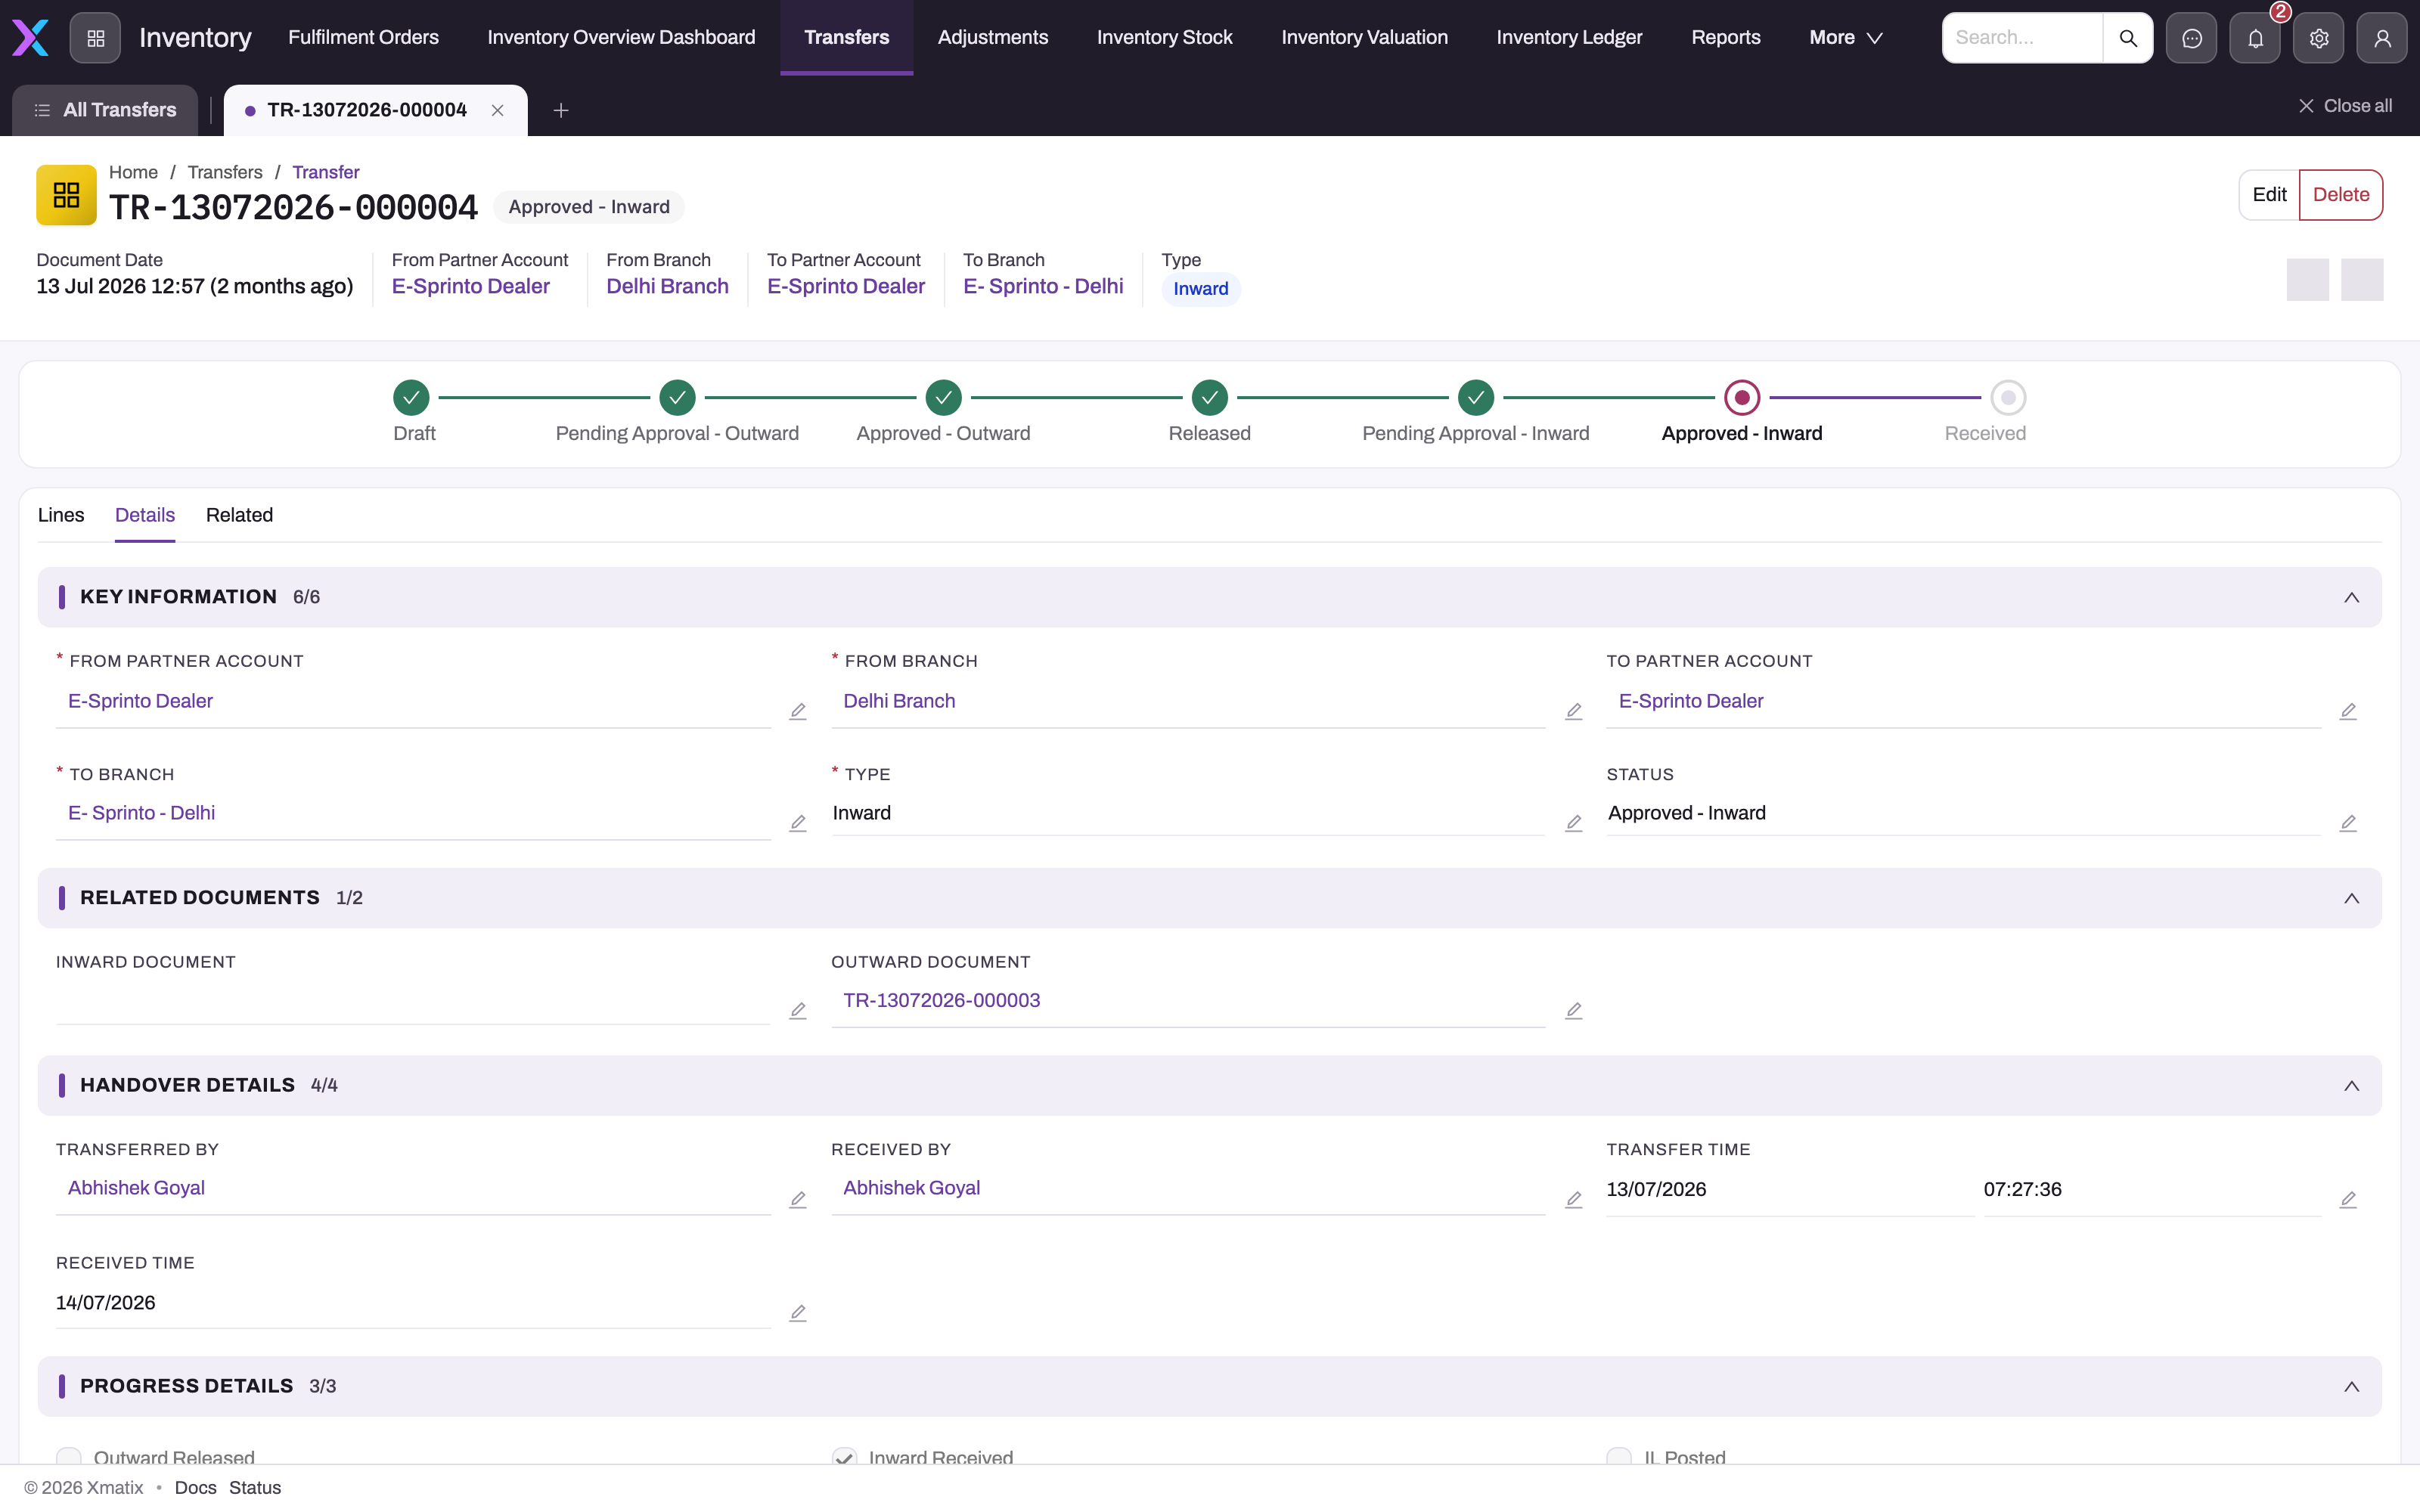
- 1
Type Inward — this document was generated by releasing the outward transfer; it cannot be created by hand.
- 2
Details holds the header and the reconciliation sections; Lines holds the Transfer Inward Lines you receive.
- 3
Key Information: source and destination partner account and branch, type and status label.
- 4
Related Documents links the paired Outward Document (and, on an outward document, the Inward Document).
- 5
Handover Details: Transferred By, Received By and the transfer/received times.
- 6
Progress Details — Outward Released, Inward Received, IL Posted — are computed from the lines. Received without IL Posted means stock is still in transit.
Use the Details tab to reconcile the document: Related Documents links the outward and inward documents to each other, Handover Details hold Transferred By, Received By and the times, and Progress Details — Outward Released, Inward Received, IL Posted — are computed from the lines. A document can be Inward Received and not IL Posted: that is exactly the state between Steps 5 and 6.
Single-step transfers
A Single Step transfer has plain Transfer Lines with a source and a Destination Storage Location. Post Inventory on it posts the outward and inward effects together — source stock down, destination stock up, no transit leg — and clones the lot for lot-tracked items. Selective Transfer posts chosen lines for a Requested Quantity up to each line's pending quantity. Use it when the move is instantaneous in practice, such as between two branches that are administratively distinct but physically together.
Expected result
Released quantity leaves the source branch and appears in transit exactly once. After receipt and posting, that quantity leaves transit and enters the destination storage location exactly once, with shortage, damage or excess recorded in their own buckets. Every leg is an inventory ledger entry: a Transfer Outward entry from the outward line and a Transfer Inward entry from the inward line, each linked to the line that posted it, so the movement reconciles end to end.
Common problems
"Received By is required to release outward document." Edit the transfer, set Received By, release again.
"Insufficient stock" on release. The line's lot or storage location does not hold the quantity — check the item's stock at the source, then correct the line; do not release another document to force the move.
Stock is "missing" at the destination. Check both milestones on the inward document: Inward Received (quantities received) and IL Posted (ledger entries exist). A document received but not posted has stock still in transit — run Post Inventory.
"No received lines found for Inventory Posting on Inward Transfer." Receive at least one line first.
Cannot receive again. The document's Inward Received flag is already on, or no line has pending quantity. If goods arrived after a short receipt closed the line, the remainder is on record as Shortage Quantity; bring the late arrival in through a new movement (an adjustment or a fresh transfer) rather than by editing the closed line.
Status looks wrong. The Status label (Draft, Approved - Inward, Released, Received…) is not maintained by the release and receive actions themselves; the Progress Details flags and the line quantities are the machine state. Trust them when reconciling.
Common questions
Can I release or receive a transfer in parts?
Release, yes, repeatedly: each selective release moves only the requested quantities and generates its own inward document; the remainder stays pending on the outward line. Receive, once per line: the received quantity is what arrived and any remainder is recorded as shortage. Post Inventory after each receipt pass so the ledger and the transit balance catch up.
Which branch does in-transit stock count against?
The destination — the stock is on its way to them — but it is a separate transit balance with no storage location, not part of the destination's on-hand or available quantity, until the received inward lines are posted. Neither branch's bin-level stock includes it before then.
Where is the warehouse view of the same movement?
Branch transfers: the warehouse view explains what each step means at the bins. Note that destination stock becomes visible only after Post Inventory on the inward document, not at Inward Receive.