
This quickstart takes the xMatix CLI from nothing to a working loop: a repository that mirrors your tenant's customization, a verified sign-in, and a script change pushed from your own editor with its execution history tailing in a terminal. It is the foundation the CI recipes build on — everything a pipeline does later, you do here once by hand.
Prerequisites
- The .NET 10 SDK installed.
- A git repository (new or existing) to hold the tenant's configuration.
- Your tenant's connection values: the tenant slug, API base URL, sign-in authority URL and the CLI's registered client id. Your administrator has these; they are entered once and persisted.
- A user account with the customization capabilities for what you plan to round-trip — the CLI can never do more than the signed-in user is permitted to do in the product.
Procedure
- 1
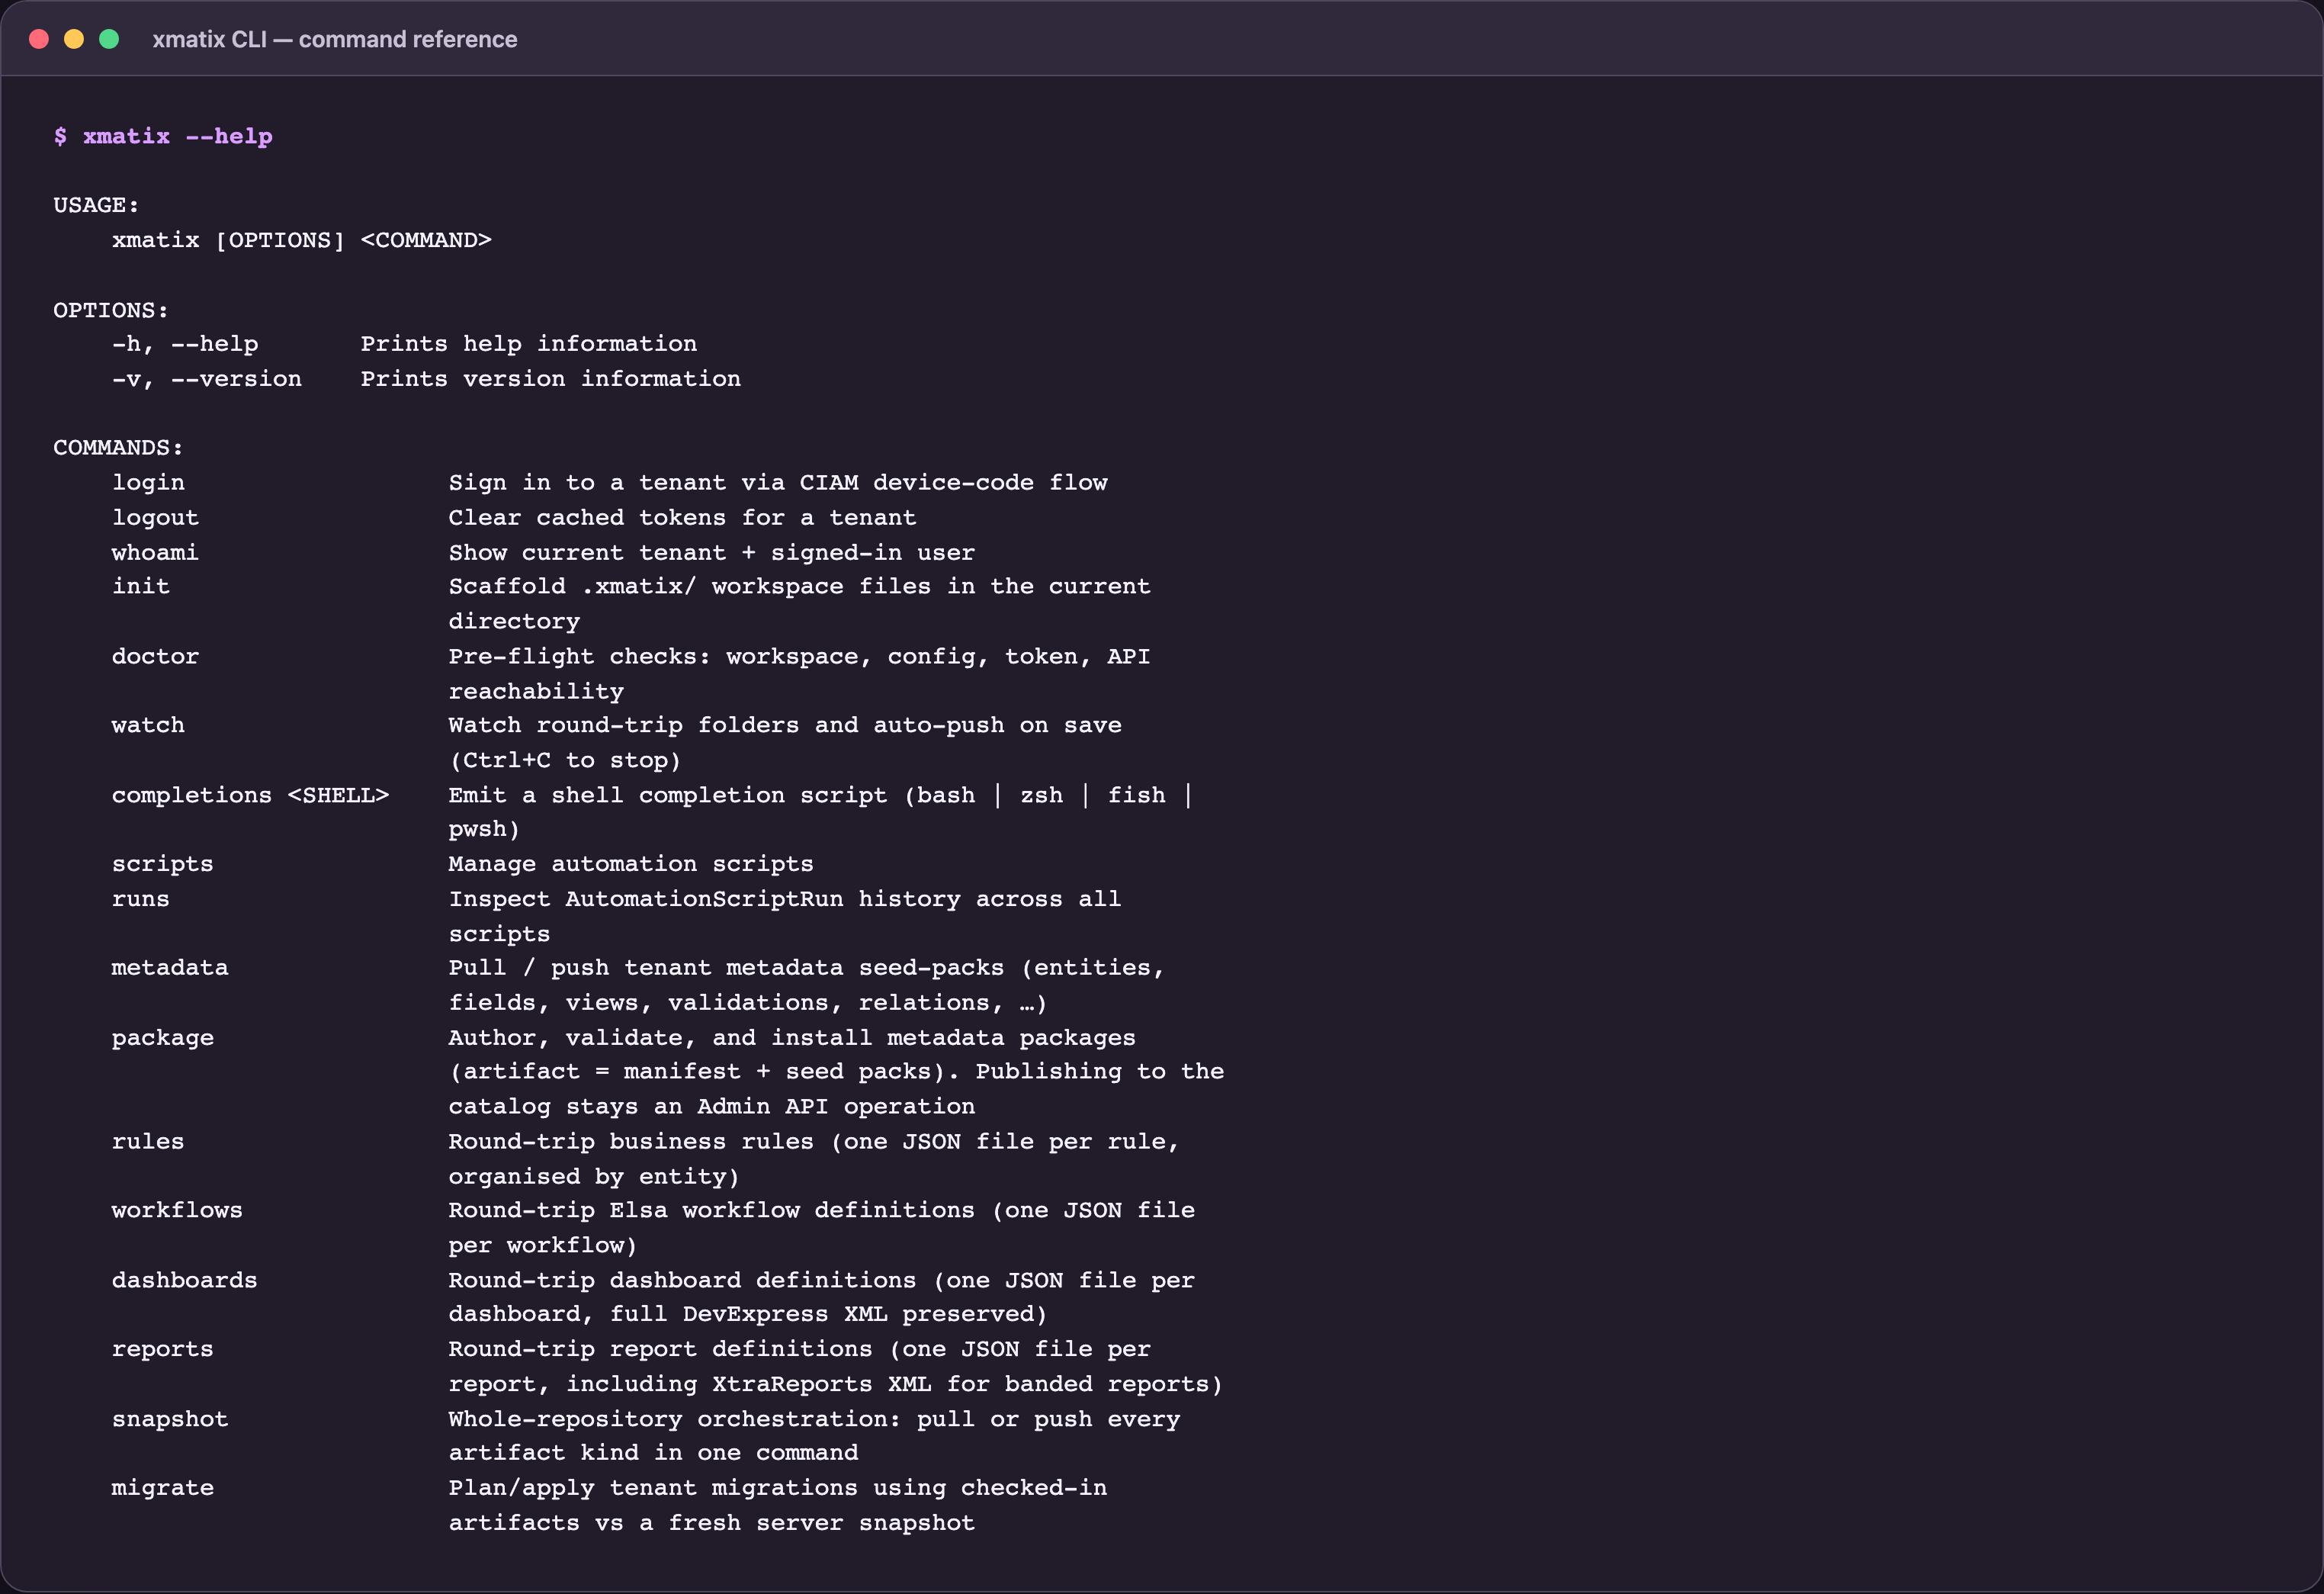
Run xmatix --help after installation to verify the global command resolves.
- 2
login, whoami and logout manage tenant authentication without storing credentials in the repository.
- 3
init scaffolds the workspace; doctor validates configuration, token and API reachability.
- 4
Artifact commands round-trip scripts, metadata, rules, workflows, dashboards and reports.
- 5
snapshot and migrate orchestrate repository-wide comparison and deployment workflows.
Step 1 — Install the CLI
dotnet tool install -g xmatix.cli
xmatix --version
The tool installs a single global command, xmatix. Run both xmatix --version and xmatix --help; the version proves the expected binary resolves on PATH, while help confirms the installed build exposes the commands used below. If another binary answers, inspect your global tool path before proceeding. To update later, use dotnet tool update -g xmatix.cli and repeat both checks.
Step 2 — Scaffold the workspace
From your repository root:
xmatix initThis creates .xmatix/ (the config directory, with a .gitignore that keeps caches and tokens out of the repo), the first canonical artifact folder, and editor tasks for common pull and push actions. Review the generated files before committing: confirm .xmatix/.gitignore covers caches and tokens and that no pre-existing project files were replaced. Run git status from the root, then run xmatix doctor from a nested folder to verify workspace discovery walks upward correctly.
Step 3 — Sign in
xmatix login --tenant <tenant> \
  --api-base-url <api-url> \
  --authority <authority-url> \
  --client-id <client-id>
The CLI prints device-code instructions—open the exact verification URL, enter the short-lived code and complete sign-in with the intended tenant user. The four non-secret connection flags persist into .xmatix/config.json; tokens are cached outside the repository in the OS credential store. Run xmatix whoami immediately and verify tenant slug and user identity before any pull or push. Inspect git status once more to prove no token or device code appeared in tracked files; details are in Authentication.
Step 4 — Run the pre-flight checks
xmatix doctorDoctor verifies the workspace root, configuration values, silent token acquisition, API reachability and every canonical artifact folder. Read every result rather than relying only on the exit code: a wrong tenant can still be reachable. Resolve red checks in order, rerun until green, then compare the reported tenant/API with whoami. Make this the first command in every working session and CI job so later failures are not misdiagnosed as artifact problems.
Step 5 — Export the tenant and commit
xmatix snapshot export
git add xmatix/ .xmatix/config.json
git commit -m "Initial tenant snapshot"
snapshot export runs every artifact kind's pull in sequence—metadata, scripts, rules, workflows, dashboards and reports—into the canonical xmatix/ tree. Review command totals and failures before staging. Run the export a second time and require a clean git diff; nondeterministic churn is a problem to solve, not a baseline to commit. Inspect representative files for secrets or tenant data, then commit the complete coherent snapshot with .xmatix/config.json only after confirming it contains connection metadata, never tokens. The workspace layout page maps the tree.
Step 6 — Change a script and push it
Open any pulled script — say xmatix/automation/scripts/Account/MyValidation.csx — make an edit, and push it:
xmatix scripts push xmatix/automation/scripts/Account/MyValidation.csx --activateThe push persists a new server version and compiles it. A failed compile remains visible in version history for diagnosis, the command exits with code 3, and the prior active version keeps running; a non-zero exit therefore means “not activated,” not “nothing was stored.” Review the diff and test input before using --activate, because activation changes live behavior while an upload without it leaves the previous version running. After a successful compile, use the product editor's Versions tab to verify the new version and active marker, then pull the script again and require byte-equivalent content. Use xmatix watch only on a controlled branch and stop it before broad refactors to avoid unintended pushes.
Step 7 — Watch it run
xmatix scripts run xmatix/automation/scripts/Account/MyValidation.csx --record <record-id>
xmatix runs tail --follow
scripts run fires a server-side dispatch against the supplied real record; it is not a dry run, so use a disposable record and identify every expected side effect first. In another terminal, runs tail --follow streams status, phase, entity, duration and errors. Match the new run to the test record and active version, verify the intended result and absence of unrelated writes, then clean up the disposable data. A successful process exit without the expected run row is not proof that the automation behaved correctly.
Expected result
xmatix --version and xmatix --help run globally, the repository contains a valid .xmatix/ workspace without committed tokens, and xmatix doctor passes workspace, configuration, authentication and API checks. A pull produces reviewable artifacts and an unchanged diff reports no drift before the first push.
Common questions
What should the first commit contain?
The xmatix/ tree and .xmatix/config.json — nothing else the CLI produces. The config file carries connection settings only (no secrets), so committing it means every teammate who clones the repo needs just xmatix login to be productive. Tokens and caches never belong in git, and init's .gitignore enforces that for anything that lands under .xmatix/.
How do teammates onboard to an existing workspace?
Clone the repo, install the tool, run xmatix login (the persisted config supplies everything but their credentials), then xmatix doctor. They sign in as themselves — the CLI acts with each user's own permissions, so there is no shared credential to manage.
I pushed a script — why is the old behavior still running?
Almost always because the push had no --activate: a pushed version uploads and compiles but does not become the active version until activated. Activation being explicit is deliberate — it means a half-finished edit can be uploaded for the record without going live. Push again with --activate, or activate the version in the product's script editor.